Currently a lot of time is being spent animating, troubleshooting, and writing my research paper. Not much fun stuff to share with you guys. So here's a nice distraction! More films, made with a game engine, that have come out in the months since my project started.
Unless you have a lot of spare time, you don't need to watch the whole things. But I do encourage you to load them up and skip around, and take a look at the quality of each:
"The Mastermind" an episode series made using the GTA. Visually pretty, though I'm not a fan of the pacing:
"Red Dead Redemption" a half hour short film that used the Red Dead Redemption engine, aired on the FOX TV network and was directed by accomplished director John Hillcoat.
"the Jackknife chronicles" a source-engine made short, shot in the first person, and featuring some kind of revenge tale.
"No Russian" - A wartime machinima film. The camera work and framing on this is very well done, but it might be considered a little too violent for some. Especially as it includes a terrorist raid on an civilian airport. But watching it evokes some pretty strong emotions, which to me signals that it's an effectively made film.
"A too much spare time cartoon" This is mostly flash driven, but it uses game engine scenery and it's very silly, so I'm adding it here.
Sunday, November 28, 2010
Friday, November 19, 2010
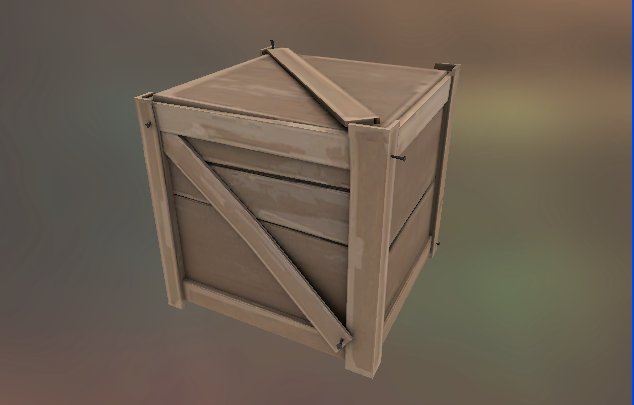
Start to Crate and the joy of moving
So as per murphy's law, as soon as I said that other stuff started happening. Some of it was bad news, like getting surprise-shafted by one of the recently changed courses at my school's department. Or the abrupt announcement that 'hey, the dept you're in isn't taking any more students, so you better finish soon.' But on the other hand, some of it was good news, like one team member getting an awesome job offer that necessitates a move to a new state.
The most recent good news is that Sonja, my audio technician in this project (and beautifully talented girlfriend outside the project) has officially moved in. We spent the weekend carting stuff from her place to mine and unpacking said stuff. It decimated any chance I had at working on the thesis this past weekend, but some things are worth the delay. Progress is still being made, and it looks like I might have the first clip of in-Source footage to show you soon.
In the meanwhile, I can share with you a bit of trivia that the moving-crate image above reminds me of. There is somewhat of a video game rating system called "start-to-crate" that was established by two game critics on the website Old Man Murray. Because item crates are such a common trope in video games, the website chronicled how long it took in each game to find the first crate, and used that as a metric to measure the game's worthiness. This cliche worried the developers of halflife2 so much that they made a crate be the first thing you see when you start controlling the character.
In a fun turn of situational irony, the creators of Old Man Murray, Chet Faliszek and Erik Wolpaw, are now Valve employees and fairly visible ones with the community, at that.
In a nod to the crate trope, I'm trying to figure out where in my short I can hide a packing crate. Any suggestions?
Wednesday, November 10, 2010
Animation test on the Thrall Character
Two posts in two days! This is madness.
I just finished compiling the office thrall character for the thesis project. He was the first asset I made for this project, and like all first attempts he needed to be fixed up. I brought him into zbrush and re-sculpted his head to give it a little more volume, and what I think is a more appealing shape.
Also, when I first imported him, his face imploded. So that had to be fixed, too.
Then I re-rigged him (using the nifty script I showed earlier), and what you see above is me just mashing the different shapes together to see how they display in the game engine. And you can see, it worked! So now I can begin animating the scenes that I have set aside from myself, while the other current animator toils away on his part.
Many hands, light work, etc etc
The first Panel Defense, and other short stories
- The first 40 seconds of foley work is complete. I'll probably replace one or two sounds by the end, but everything is properly mixed and the scenes have been re-timed to match.
- One of the animators on my team has, in a beautiful twist of irony, accepted a job at one of the companies mentioned on this blog. It's wonderful news, but it will take that animator out of the project until life settles down enough to allow free time for it.
- There was a trial run for the thesis defense panel this past monday, where I had to take what I had so far and pitch it to two instructors who were acting as a panel. I pitched the project, they asked questions, and at the end of the session I can safely say I knocked it out of the park. I stumbled over my words a little, so when it comes time for my final thesis panel, I will be sure to practice speaking about it, out loud, repeatedly.
- The thrall character has been re-rigged to match all the improvements that were added to the chef. Just as before, without doing the face shapes it took about 45 minutes. Face shapes should be finished tonight
- I have created a personal brand to stamp on all my works, and have used it to update my resume and website: www.gregmourino.com
Wednesday, October 27, 2010
In which I rig the heck outta this chef
As I think I mentioned earlier in the blog, my characters are using skeletons to drive their movements. Since the game engine doesn't support the nifty shape-deforming tools that are available to CG filmmakers, I've got to make do with a basic skeleton. Think of how traditional stop-motion films are made, with their little wire frames inside a clay/foam body. It's the same basic thing.
Well, once you've got a body full of bones, you can grab them and start animating. But that's a bad idea, because it would take foreeeeeeeeeeeever. This is why we need rigs in animation. The word 'rig', in animation, refers to a whole system of controls and attachments that we stick to a character to make animation easier and quicker for the animators.
For example, I could animate a character sitting down by manually moving each individual joint all over the body down one frame at a time, until he was settled in a chair. But really, I'd rather just grab him by the waist, drag that down, and let the computer calculate the rest. That's an over-simplification of what a rig can do, but you get my point.
A lot of people in the industry hate rigging. They speak of rigging the way most American grownups speak about math. "Oh I was never very good at that stuff" "Man, I hate that stuff, never touched it since school" etc. Well I love math, and while I won't be writing any poetic adulations of The Rig, I don't mind riggin' either. It's fun puzzle out how to build all those controls to be easy for the animator, yet still work correctly. It's like uber-advanced virtual lego building.
To make rigging easier for me, and to speed things up when thesis hit, I've been spending spare moments over the past year making a rigging tool. It's called 'gRig'. It's a program I wrote using Maya's scripting language. It basically automates as much of the rig creation process as possible, and makes it easy to do the rest by hand.

So, using this tool, and armed with the massive list of improvements suggested by my animators, I updated it once more and used it to build a new version of the chef character. This time, I decided to record the process and share it with you. As a note: rigging a character is something people usually spend days on. I'm awfully proud I was able to pull off everything but the facial expressions in 45 minutes.
Another note: this is only a one-minute time lapse video of those 45 minutes
Well, once you've got a body full of bones, you can grab them and start animating. But that's a bad idea, because it would take foreeeeeeeeeeeever. This is why we need rigs in animation. The word 'rig', in animation, refers to a whole system of controls and attachments that we stick to a character to make animation easier and quicker for the animators.
For example, I could animate a character sitting down by manually moving each individual joint all over the body down one frame at a time, until he was settled in a chair. But really, I'd rather just grab him by the waist, drag that down, and let the computer calculate the rest. That's an over-simplification of what a rig can do, but you get my point.
A lot of people in the industry hate rigging. They speak of rigging the way most American grownups speak about math. "Oh I was never very good at that stuff" "Man, I hate that stuff, never touched it since school" etc. Well I love math, and while I won't be writing any poetic adulations of The Rig, I don't mind riggin' either. It's fun puzzle out how to build all those controls to be easy for the animator, yet still work correctly. It's like uber-advanced virtual lego building.
To make rigging easier for me, and to speed things up when thesis hit, I've been spending spare moments over the past year making a rigging tool. It's called 'gRig'. It's a program I wrote using Maya's scripting language. It basically automates as much of the rig creation process as possible, and makes it easy to do the rest by hand.
So, using this tool, and armed with the massive list of improvements suggested by my animators, I updated it once more and used it to build a new version of the chef character. This time, I decided to record the process and share it with you. As a note: rigging a character is something people usually spend days on. I'm awfully proud I was able to pull off everything but the facial expressions in 45 minutes.
Another note: this is only a one-minute time lapse video of those 45 minutes
Tuesday, October 19, 2010
The importance of Advice and Critiques
A common question asked in job interviews, especially for a creative, is "how well do you take criticism?"
Constructive criticism is the very keystone of what makes a great production. No matter how awesome, how talented, how godly you think your favorite director/artist is, they're not. At least, they're not that awesome all on their own. Sure, there's skill in there, but one thing that separates these great creators from the pack is their ability to sit back, listen to a critique, and learn. They listen to people around them when they are told that a joke doesn't work, or a character's design doesn't fit. They cut out parts of the story that don't make sense to their peers. And in the words of one of my classmates, they're ready to "eat their baby" if the project falls flat and needs to be completely revamped.
You'd think this is common knowledge, but after someone has spent hours, days, and weeks sweating over something... to hear someone else say that it is bad, well that hurts. It feels personally insulting. It's not though. Most often, it's objective and it's honest.
I see many of my fellow students ignoring advice as we critique each other's projects in class. I am guilty of it myself, two posts back on this blog, when my adviser told me the project was too much to handle. (small addendum here, after meeting with her last night and reviewing my production book, she has agreed that the project is in striking distance) But with that exception I have been making a conscious effort to listen to the advice of those around me. Especially from the members on my team.
Their time is valuable. It is a commodity that must be split between their own projects, mine, work, and personal lives. And if they're going to spend some of it to give me advice and help me improve my craft, I damn well better listen. Take, for example, this message. The text is blurred, but note, if you will, the size:

This isn't some half-baked critique. It's not someone rolling their eyes and saying "eh, it's okay I guess." This is an essay. It's an investment. It's a lot of verbage. And it's not an isolated case, either. I have teammates that are willing to invest a lot of time not just in the project, but in helping *me* specifically to accomplish it.
This isn't meant to be a flattery post. I'm pretty sure the author of the specific message above doesn't read the blog. But it's a point I want to make: messages like this are a gold mine. I'm lucky to have so much time invested in my improvement. If I listen and learn, hopefully one day I can be a respectable project lead.
The alternative is, well, if I chose the alternate route I probably shouldn't be in charge of anything. Even my own thesis.
Constructive criticism is the very keystone of what makes a great production. No matter how awesome, how talented, how godly you think your favorite director/artist is, they're not. At least, they're not that awesome all on their own. Sure, there's skill in there, but one thing that separates these great creators from the pack is their ability to sit back, listen to a critique, and learn. They listen to people around them when they are told that a joke doesn't work, or a character's design doesn't fit. They cut out parts of the story that don't make sense to their peers. And in the words of one of my classmates, they're ready to "eat their baby" if the project falls flat and needs to be completely revamped.
You'd think this is common knowledge, but after someone has spent hours, days, and weeks sweating over something... to hear someone else say that it is bad, well that hurts. It feels personally insulting. It's not though. Most often, it's objective and it's honest.
I see many of my fellow students ignoring advice as we critique each other's projects in class. I am guilty of it myself, two posts back on this blog, when my adviser told me the project was too much to handle. (small addendum here, after meeting with her last night and reviewing my production book, she has agreed that the project is in striking distance) But with that exception I have been making a conscious effort to listen to the advice of those around me. Especially from the members on my team.
Their time is valuable. It is a commodity that must be split between their own projects, mine, work, and personal lives. And if they're going to spend some of it to give me advice and help me improve my craft, I damn well better listen. Take, for example, this message. The text is blurred, but note, if you will, the size:
This isn't some half-baked critique. It's not someone rolling their eyes and saying "eh, it's okay I guess." This is an essay. It's an investment. It's a lot of verbage. And it's not an isolated case, either. I have teammates that are willing to invest a lot of time not just in the project, but in helping *me* specifically to accomplish it.
This isn't meant to be a flattery post. I'm pretty sure the author of the specific message above doesn't read the blog. But it's a point I want to make: messages like this are a gold mine. I'm lucky to have so much time invested in my improvement. If I listen and learn, hopefully one day I can be a respectable project lead.
The alternative is, well, if I chose the alternate route I probably shouldn't be in charge of anything. Even my own thesis.
Monday, October 11, 2010
Commence Production!
Animation starts this week. Two weeks behind my originally planned date, but I decided that the delay was necessary to set stuff up properly for my animators. Taking a few days to properly sort out the audio and triple-checking the rig for things that might break will hopefully save us time in the long run. And I'm still gunning for a Christmas completion for production.
That's the plan, anyway!
That's the plan, anyway!
Monday, October 4, 2010
Repent, unbelievers!
I just had an interesting conversation with my thesis adviser. I've been dreading this conversation, because I knew exactly how it was going to go down. First let me give some background: even though she was aware of my project's goals, she was not aware of the length and depth of it. Also, the class is currently at the stage where characters are being drawn up and thesis statements are being hammered out. The thesis class is not yet up to the point where anyone officially has a script. I was at this point last February.
So anyway, the conversation went more or less like this:
Let's pause here, for a second. Greg is not somebody that you tell him, to his face, that he is incapable of something. You can tell him that it's not in the budget, it's not what the director wants, it's morally reprehensible, or whatever. But never, ever tell him that it's something that can't be done because he won't be able to hack it. Because, you see, Greg is a very stubborn man. Telling him that just makes him want to do it even more, just to prove you wrong. Once upon a time, Greg was told after a sudden sickness that he would have to drop his job and his schooling for the treatment. Just to spite that diagnosis, he kept at it and came out victorious. This is the kind of Greg that he is. So naturally, you can guess what his reaction was upon hearing his adviser's assessment of the thesis project.
So, back to the conversation, it followed:
OH SNAP.
I can't hold it against my adviser. She has my best interests in mind. And it's also in her best interests to make sure each student has a project that is feasible, so they can get an accomplishment and use it for job hunting. It's really not her fault that she does not believe the project can be done. Especially when our program has a history of students who over stretch themselves and crash/burn before graduation.
If her assessment had merit, I would be standing back and re-considering my position. But the simple truth of it is, her assessment is not meritful. I have gone through the schedule with a fine-toothed comb, and have compared notes with working professionals in the field. I know my own abilities, and have the utmost faith (based on quantitative observations) in those that have agreed to help me.
At this point, there is no reason why the project can NOT be done. I have a lot of respect for my adviser, she's an experienced professional in her own right. But I will still enjoy showing up to her office door with a finished copy of the thesis project. Several months early.
Because that's the kind of Greg that I am.
So anyway, the conversation went more or less like this:
- Adviser acknowledges thesis statement and character design, asks to see other concepts for project
- Greg shows scene layouts and art
- Adviser raises concerns that an animation-heavy piece with two scenes will be too much to handle
- Greg states that many assets have already been constructed, and shows examples
- Adviser suggests that the script be paired down to two scenes, to make it manageable
- Greg states that he has two talented animators on board to help with the animation process
- Adviser ignores this and states, nicely, that it can't be done
Let's pause here, for a second. Greg is not somebody that you tell him, to his face, that he is incapable of something. You can tell him that it's not in the budget, it's not what the director wants, it's morally reprehensible, or whatever. But never, ever tell him that it's something that can't be done because he won't be able to hack it. Because, you see, Greg is a very stubborn man. Telling him that just makes him want to do it even more, just to prove you wrong. Once upon a time, Greg was told after a sudden sickness that he would have to drop his job and his schooling for the treatment. Just to spite that diagnosis, he kept at it and came out victorious. This is the kind of Greg that he is. So naturally, you can guess what his reaction was upon hearing his adviser's assessment of the thesis project.
So, back to the conversation, it followed:
- Greg points out all the preparation he has done for this project, the size and talent of his team.
- Adviser attempts to compromise by asking the project to be slimmed down.
- Greg asserts that he will cut out anything that is unnecessary, keeping in mind that he has already done several passes of exactly that over the summer
- Adviser asks Greg to pinky swear on his honor that he will set a realistic goal for this project.
OH SNAP.
I can't hold it against my adviser. She has my best interests in mind. And it's also in her best interests to make sure each student has a project that is feasible, so they can get an accomplishment and use it for job hunting. It's really not her fault that she does not believe the project can be done. Especially when our program has a history of students who over stretch themselves and crash/burn before graduation.
If her assessment had merit, I would be standing back and re-considering my position. But the simple truth of it is, her assessment is not meritful. I have gone through the schedule with a fine-toothed comb, and have compared notes with working professionals in the field. I know my own abilities, and have the utmost faith (based on quantitative observations) in those that have agreed to help me.
At this point, there is no reason why the project can NOT be done. I have a lot of respect for my adviser, she's an experienced professional in her own right. But I will still enjoy showing up to her office door with a finished copy of the thesis project. Several months early.
Because that's the kind of Greg that I am.
Saturday, September 25, 2010
WIP Thesis paper now available!
So I now have a draft version of the pre-production book, otherwise known as a thesis paper. You can find a link to that above, on this blog's header! (Also in the thesis documents link to the right)
As it turns out, I wont have to write as much of a paper as I thought. The program I'm in has rather strict definitions of what constitutes research and paper writing in general. While I will still have to abide by academic standards and MLA citation and all that, there will be less verbosity and more... well, visual stuff. The slightly rigid definitions of the paper also cover my general thesis statement as well. I was directed to create a two part statement that listed a) the creative aspect of my project and b) the technical aspect of it.
What I have now in the paper is what suits my advisers best. But the edited statement made in my last post is what I feel a more accurate description of where this all is going. So I sort of have two thesis statements now. Awesome. I will eventually convince my advisers to let me merge the two, but like all things at NYU, that will be a slow process.
In the meantime, look at the pretty flash version of the WIP paper! It's made using indesign, and the whole project will be entirely digital. (you're welcome, trees) It contains a the latest version of the storyboard, where I reordered a couple frames and trimmed a couple others for time considerations. At the end, it has a shot list, where I break down each of the shots of this project and what each will entail. As you can see, a chunk of the animator spaces are empty. As soon as I can figure out which of my generous animator friends can do which, that will be filled in. And then this party will really get started!
Thursday, September 23, 2010
In which my thesis project steps sideways
I thought my driving thesis idea was pretty solid. So, too, did most of the folk I told about it. It just seems smart, to harness all this powerful technology to help us do what we've always done, but faster.
As it turns out, Mental Images, the folk behind mental ray, thought so too. In fact, they thought so before I ever did, and went about making a product to do just that. It was recently announced, it exists and it's called iray.
There are caveats to using it. You need a professional card to use it, and it isn't yet implemented into many of the 3D software packages out there. I haven't actually seen this used in person yet.
But it exists.
That kind of takes the wind out of my sails, doesn't it? On the one hand, I feel like a smart little nerd for coming up with a concept that was also developed by smart folk that do this sort of thing for a living. But on the other hand, well, I don't have much to prove anymore. I must have been *close* to being right, or Mental Images would have never gone through the expense of making the iray product.
I could still make the argument and say that hey, using game engine tools makes animation even cheaper and available to the masses! (game engines are free or cheap, professional hardware is quite expensive) Just going through the videos I've posted here before has shown how this technology is up to snuff. If it's good enough for broadcast TV, it's good enough to be considered professional quality! And a few seconds of poking through youtube will show you a veritable army of people that are attempting to make machinima using these easy-to-get tools.
So henceforth, my thesis project is now:
So I'm no longer trying to prove the 'hardware versus software' debate. Those forces have been joined and the battle there is over. But in the words of my friend Alex, I don't need to prove that anyone should be doing anything. Instead I am going to point out that these tools exist, and can be used to make stuff that meets professional standards.
And we're going to prove it by making high-quality-awesome-things with said tools.
As it turns out, Mental Images, the folk behind mental ray, thought so too. In fact, they thought so before I ever did, and went about making a product to do just that. It was recently announced, it exists and it's called iray.
There are caveats to using it. You need a professional card to use it, and it isn't yet implemented into many of the 3D software packages out there. I haven't actually seen this used in person yet.
But it exists.
That kind of takes the wind out of my sails, doesn't it? On the one hand, I feel like a smart little nerd for coming up with a concept that was also developed by smart folk that do this sort of thing for a living. But on the other hand, well, I don't have much to prove anymore. I must have been *close* to being right, or Mental Images would have never gone through the expense of making the iray product.
I could still make the argument and say that hey, using game engine tools makes animation even cheaper and available to the masses! (game engines are free or cheap, professional hardware is quite expensive) Just going through the videos I've posted here before has shown how this technology is up to snuff. If it's good enough for broadcast TV, it's good enough to be considered professional quality! And a few seconds of poking through youtube will show you a veritable army of people that are attempting to make machinima using these easy-to-get tools.
So henceforth, my thesis project is now:
I will demonstrate how high-quality animated entertainment can be produced via readily available game engine tools, such as the Source engine by Valve Software
So I'm no longer trying to prove the 'hardware versus software' debate. Those forces have been joined and the battle there is over. But in the words of my friend Alex, I don't need to prove that anyone should be doing anything. Instead I am going to point out that these tools exist, and can be used to make stuff that meets professional standards.
And we're going to prove it by making high-quality-awesome-things with said tools.
Sunday, September 19, 2010
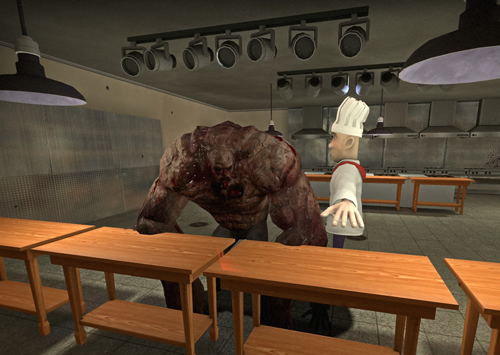
This chef did nothing to help me
This chef just stood by while a huge zombie tore up my kitchen and killed my film crew.What a terrible day that was.
...If I'm going to be making an animation in a game engine, I can't help but goof around a little every now and then, so while I'm testing out my two scenes for the short (the office and the kitchen) every now and then I fill them with zombies:

But silliness aside, I have successfully tested out a way to load up my characters into the engine, and display animation. That leaves one last hurdle: recording video from the engine. There are tutorials on this topic online, so that will hopefully be an easy test. Then it's onward to producing the actual animation for the short!
At this point, I am wrapping up the pre-production aspect of the project and beginning production in earnest. This puts me almost an entire semester ahead of the game, because my pre-production class just started this past week. As mentioned before, I started early because this is an ambitious project and I want to be absolutely sure to finish on time. Using and learning new tools makes any production a bit difficult, and subject to learning-curve delays. I'm happy to look back on the past several months and see that I was able to mostly stick to my schedule, and stick to my guns to get so much done.
I did hit one major snag this past week, but it was not a technical issue as much as it was a general thesis issue. So that deserves its own post, which will be next!
...If I'm going to be making an animation in a game engine, I can't help but goof around a little every now and then, so while I'm testing out my two scenes for the short (the office and the kitchen) every now and then I fill them with zombies:
But silliness aside, I have successfully tested out a way to load up my characters into the engine, and display animation. That leaves one last hurdle: recording video from the engine. There are tutorials on this topic online, so that will hopefully be an easy test. Then it's onward to producing the actual animation for the short!
At this point, I am wrapping up the pre-production aspect of the project and beginning production in earnest. This puts me almost an entire semester ahead of the game, because my pre-production class just started this past week. As mentioned before, I started early because this is an ambitious project and I want to be absolutely sure to finish on time. Using and learning new tools makes any production a bit difficult, and subject to learning-curve delays. I'm happy to look back on the past several months and see that I was able to mostly stick to my schedule, and stick to my guns to get so much done.
I did hit one major snag this past week, but it was not a technical issue as much as it was a general thesis issue. So that deserves its own post, which will be next!
Thursday, September 16, 2010
Joint-Based Face Rig - Part 5: Loose Lips Sink Ships
The joints around the mouth are the bit of this joint-based rig that gave me the most trouble. The mouth is an awfully complex series of... things. Fortunately, I am not the first person to make a bone-based face! Once again, with the kindness of professionals in the field, I have navigated these treacherous waters.
So how to do it? Place a ring of bones around the lips, just inside the skin and slightly deep into the lip itself. If you put the joint on the edge of the lip, you wouldn't be able to rotate it and get a nice lip purse. The number of bones you place in a ring is dependent on how detailed you want to get. Will this character have closeups? You'll need a bunch. If not, three on top and three on the bottom would work.

It will be helpful if you can add one more joint after each of these, to help orient the lip joints. These would ideally be right on the edge of the lip, and otherwise ignored. I could not do this on my setup, because I am right up against the max joint limit per characters, but it would have saved me some time in orienting these buggers.
As for the tongue, a simple chain of joints will do the trick. And that concludes the face tutorial. You can do other bits like the nose and ears, but the basics are all there. Once these bones are nicely skinned to the face, you can build a rig on them and move them as you see fit. I chose to make a series of Set Driven Keys to move the lips into common poses for lip-synching.
If you would like to see an example of what I mean, here is the same file that I linked in part 1, only this time it has all the rig controls built on top of the basic skeleton. This is fairly close to what I'm actually using in my animated short. You are free to take this and mess around with it, but please don't sell my stuff.

The above maya project file is licensed under a Creative Commons nonCommercial Liscence.
Click on the link for details.
So how to do it? Place a ring of bones around the lips, just inside the skin and slightly deep into the lip itself. If you put the joint on the edge of the lip, you wouldn't be able to rotate it and get a nice lip purse. The number of bones you place in a ring is dependent on how detailed you want to get. Will this character have closeups? You'll need a bunch. If not, three on top and three on the bottom would work.

It will be helpful if you can add one more joint after each of these, to help orient the lip joints. These would ideally be right on the edge of the lip, and otherwise ignored. I could not do this on my setup, because I am right up against the max joint limit per characters, but it would have saved me some time in orienting these buggers.
As for the tongue, a simple chain of joints will do the trick. And that concludes the face tutorial. You can do other bits like the nose and ears, but the basics are all there. Once these bones are nicely skinned to the face, you can build a rig on them and move them as you see fit. I chose to make a series of Set Driven Keys to move the lips into common poses for lip-synching.
If you would like to see an example of what I mean, here is the same file that I linked in part 1, only this time it has all the rig controls built on top of the basic skeleton. This is fairly close to what I'm actually using in my animated short. You are free to take this and mess around with it, but please don't sell my stuff.
The above maya project file is licensed under a Creative Commons nonCommercial Liscence.
Click on the link for details.
Monday, September 13, 2010
Joint-Based Face Rig - Part 4: Turn the other cheek
I've been told that this blog is getting hard to read for the layman. I'm sorry! I wanted to go into some detail on the face rig part, because it presented such a huge problem to me. We'll go back to regular things after the next post.
As for cheeks, they were just as easy as the eyes. The face moves with the eyes, and the cheeks are another often-overlooked part of facial animation. Do you want your character to look half-dead? Then by all means, ignore the cheeks.
If you want to add a little more to the pot, then a simple triangle of joints on each cheek will suffice. One under the eye for squints, one on the outer cheek, and one outside the naso-labial fold.

And that's all I have to say about that.
Thursday, September 9, 2010
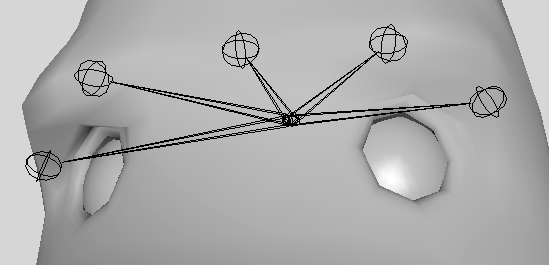
Joint-Based Face Rig - Part 3: Eyes on the Prize
The eyes were easy.
And they shouldn't be. The eyes are the window to the soul, as they say, and that is where the audience will spend most its time looking. To that effect, eyes deserve all sorts of wonderful deformers to allow them the greatest range of expression possible. For much the same reason for other parts of the rig, this simply can't be done with a game engine (yet).

But we can cheat it very nicely :) My approach to the eyes was as straightforward as they come. I plopped a joint right smack in the middle of the eye, and bound the eye to that. The eye rotates along with the joint at its center, and all is right with the world.
What about eyelids? Well, for those I just duplicated the eyeball joint twice. One for the top and one for the bottom eyelids. Then I painted the weights of the joints on the skin around the eyes veeeeeery slowly, testing every few strokes to make sure I had a good balance. I took a screenshot of my weightings to give an example. The weight display is inverted and clamped to be easily visible! In actuality, the weighting appears very muted and gray because of how I spread it out around the eye.

You'll notice up above I have a third image as well. To add just a touch more believability, I shared a little bit of the skins weighting with the original eyeball joint. That way, as the eye looks around, it sort of snags the skin around it. It's not much, but it does add a bit of life to the character.
And they shouldn't be. The eyes are the window to the soul, as they say, and that is where the audience will spend most its time looking. To that effect, eyes deserve all sorts of wonderful deformers to allow them the greatest range of expression possible. For much the same reason for other parts of the rig, this simply can't be done with a game engine (yet).
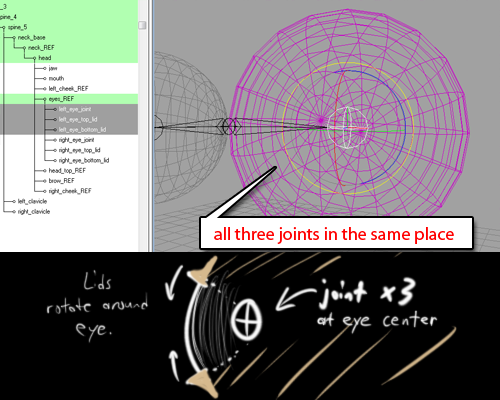
But we can cheat it very nicely :) My approach to the eyes was as straightforward as they come. I plopped a joint right smack in the middle of the eye, and bound the eye to that. The eye rotates along with the joint at its center, and all is right with the world.
What about eyelids? Well, for those I just duplicated the eyeball joint twice. One for the top and one for the bottom eyelids. Then I painted the weights of the joints on the skin around the eyes veeeeeery slowly, testing every few strokes to make sure I had a good balance. I took a screenshot of my weightings to give an example. The weight display is inverted and clamped to be easily visible! In actuality, the weighting appears very muted and gray because of how I spread it out around the eye.
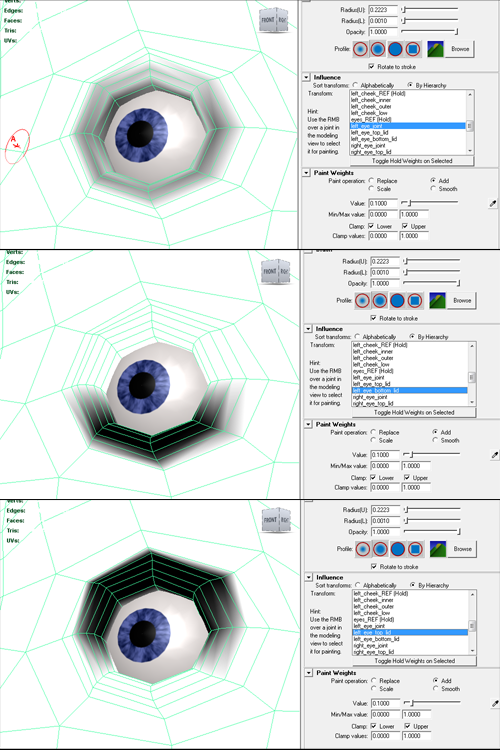
You'll notice up above I have a third image as well. To add just a touch more believability, I shared a little bit of the skins weighting with the original eyeball joint. That way, as the eye looks around, it sort of snags the skin around it. It's not much, but it does add a bit of life to the character.
Tuesday, September 7, 2010
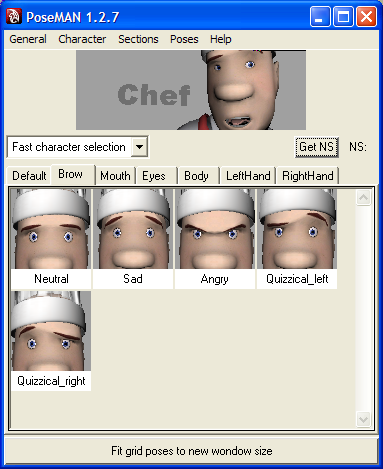
Joint-Based Face Rig - Part 2: Brow-beater
My approach to rigging up the face using only bones is very simple:

Any seasoned animator will tell you that the whole brow is connected as if it were a giant curve; when one side is pushed into a position, the other side is pulled over in response. Several of the tutorials I discovered used this as a basis for their rigs. I want to emulate that curve-like behavior, but Source does not support curves as deformers, only joints. This leaves me with two options: figure out a way to make joints attach themselves to a curve (but leave them adjustable for animation), or manually animate each and every joint to mimick curve-like behavior. Neither of those sound like very fun options.
My solution in a common tool used by animators called a pose manager. Rather than make an uber complex setup that limits the movement of the character's brow, I simple make a row of joints that span the brow, weight them in a very smooth gradient between each other, and use a pose manager to create the simple brow shapes that an animator can work with.

This prevents the need for complex curve-mimicking setups, and allows the animator to retain full control. I used five brow joints in the characters for this project. After some especially helpful advice from a veteran rigger, I have them all grouped under a non-used joint called Brow_REF, and that joint is connected back to the main head joint. Using empty "reference" joints like this can be a huge relief. It helps to keep the face neatly organized, and it only takes a few seconds to lock it down while you are skinning the weights.

- Create enough bones to cover the entire face, with enough detail for areas of interest (eyes, mouth)
- Skin those bones so that they pleasantly deform the face
- Attach a series of animator controls to those bones to drive their motion
- Brow (covered in this post)
- Eyes (covered in part 3)
- Cheeck/Nose (covered in part 4)
- Mouth (covered in part 5)
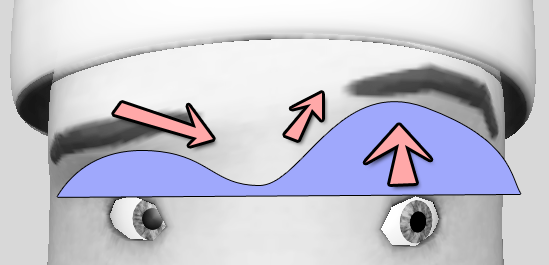
The whole brow is connected. Movement on one side will pull at the other
Any seasoned animator will tell you that the whole brow is connected as if it were a giant curve; when one side is pushed into a position, the other side is pulled over in response. Several of the tutorials I discovered used this as a basis for their rigs. I want to emulate that curve-like behavior, but Source does not support curves as deformers, only joints. This leaves me with two options: figure out a way to make joints attach themselves to a curve (but leave them adjustable for animation), or manually animate each and every joint to mimick curve-like behavior. Neither of those sound like very fun options.
My solution in a common tool used by animators called a pose manager. Rather than make an uber complex setup that limits the movement of the character's brow, I simple make a row of joints that span the brow, weight them in a very smooth gradient between each other, and use a pose manager to create the simple brow shapes that an animator can work with.
This prevents the need for complex curve-mimicking setups, and allows the animator to retain full control. I used five brow joints in the characters for this project. After some especially helpful advice from a veteran rigger, I have them all grouped under a non-used joint called Brow_REF, and that joint is connected back to the main head joint. Using empty "reference" joints like this can be a huge relief. It helps to keep the face neatly organized, and it only takes a few seconds to lock it down while you are skinning the weights.
Monday, September 6, 2010
Joint-Based Face Rig - Part 1
Early in on this project, I stumbled across a significant problem.

My problem is: there is no easy way to transfer facial animations from Maya to the Source engine. Without the ability to transfer data back and forth, it would be very difficult to produce the same exact short using each of the two methods. I mean, sure, we could re-animate each scene twice... but for me, that sounds like a needless waste of time and also would introduce some unwelcome variables into my study. The issue here lies in how each of the programs deal with blendshapes.
Anyway, since there is no way to transfer blendshape animation data back and forth from these two sources, my only feasible option is to ignore blendshapes entirely and do everything with bones. You can animate a character's face with nothing but a pile of bones, and in some places this is very useful. The jaw is a great example of this. Natural jaw motion rotates, where jaw motions done with blendshapes tend to be linear and kinda gross looking in comparison. So, armed with little anecdotes like this, I strove out a couple months ago to pin down the best way to make a full face using bones...
...and I found zippo. When it comes to joint-based rigs, nobody seems to agree on anything. There are, maybe, four decent tutorials spread across all the internet on how to do this. And at the time of this writing, one of those has been taken down. The rigging books I purchased had little to say on the matter. Sure there's a few demo videos by riggers and Technical Directors on Vimeo and Youtube, but they are not as instructive as they are braggy. In an effort to save some other poor soul the time it took me to gather info, my next several posts will be about this process.
In the end, I couldn't turn to any of these (or the others I stumbled across) for guidance. Many of them weren't exclusively bone-driven, and used tools that aren't available to me in my project. So I took what info I could, cobbled together things that I had figured out on my own, and got some guidance from some knowledgeable folk to help me avoid the really big roadbumps. In the end, I came up with this:

My next post will start going into the down-and-dirty, but for anyone who has stumbled across this blog post looking for an example of a joint-based face rig, joint-driven, bone-based, bone-driven, or however-you-call-it rigs, here is a basic example file, containing everything used to make the images above:
Maya 2009 project folder: Chef Bone Rig Example
(I should clarify, this isn't a full rig with all animation controls and such. It's just the geometry and the skeleton with all the skinning you need to make a pose. The finished product is available on part 5 of this post)

The opinion of Random Chef is not necessarily the opinion of myself. I don't mind blendshapes,
in fact I think they're pretty useful.
My problem is: there is no easy way to transfer facial animations from Maya to the Source engine. Without the ability to transfer data back and forth, it would be very difficult to produce the same exact short using each of the two methods. I mean, sure, we could re-animate each scene twice... but for me, that sounds like a needless waste of time and also would introduce some unwelcome variables into my study. The issue here lies in how each of the programs deal with blendshapes.
- For the layman I will explain: blendshapes are typically a bunch of pre-made facial expressions for the animators to use, so they are able to transition from one to the other while they work. A really good parallel can be drawn to the way faces were done in the movie Coraline.
Anyway, since there is no way to transfer blendshape animation data back and forth from these two sources, my only feasible option is to ignore blendshapes entirely and do everything with bones. You can animate a character's face with nothing but a pile of bones, and in some places this is very useful. The jaw is a great example of this. Natural jaw motion rotates, where jaw motions done with blendshapes tend to be linear and kinda gross looking in comparison. So, armed with little anecdotes like this, I strove out a couple months ago to pin down the best way to make a full face using bones...
...and I found zippo. When it comes to joint-based rigs, nobody seems to agree on anything. There are, maybe, four decent tutorials spread across all the internet on how to do this. And at the time of this writing, one of those has been taken down. The rigging books I purchased had little to say on the matter. Sure there's a few demo videos by riggers and Technical Directors on Vimeo and Youtube, but they are not as instructive as they are braggy. In an effort to save some other poor soul the time it took me to gather info, my next several posts will be about this process.
Here's a few of the demos I found:
A Few Tutorials I found:
DirtyOldToon's Tutorial (currently dead)
Joint-Based Facial Animation - Kilia Tutorial (This is closest to what I ended up doing)
In the end, I couldn't turn to any of these (or the others I stumbled across) for guidance. Many of them weren't exclusively bone-driven, and used tools that aren't available to me in my project. So I took what info I could, cobbled together things that I had figured out on my own, and got some guidance from some knowledgeable folk to help me avoid the really big roadbumps. In the end, I came up with this:

My next post will start going into the down-and-dirty, but for anyone who has stumbled across this blog post looking for an example of a joint-based face rig, joint-driven, bone-based, bone-driven, or however-you-call-it rigs, here is a basic example file, containing everything used to make the images above:
Maya 2009 project folder: Chef Bone Rig Example
(I should clarify, this isn't a full rig with all animation controls and such. It's just the geometry and the skeleton with all the skinning you need to make a pose. The finished product is available on part 5 of this post)
Friday, August 27, 2010
The importance of Geometry Flow
As the schedule goes, right now I ought to be rigging the chef character. I'm a couple days behind schedule, but for a very good reason relating to bone-based (or joint-based) face rigs. The next post will likely cover that.
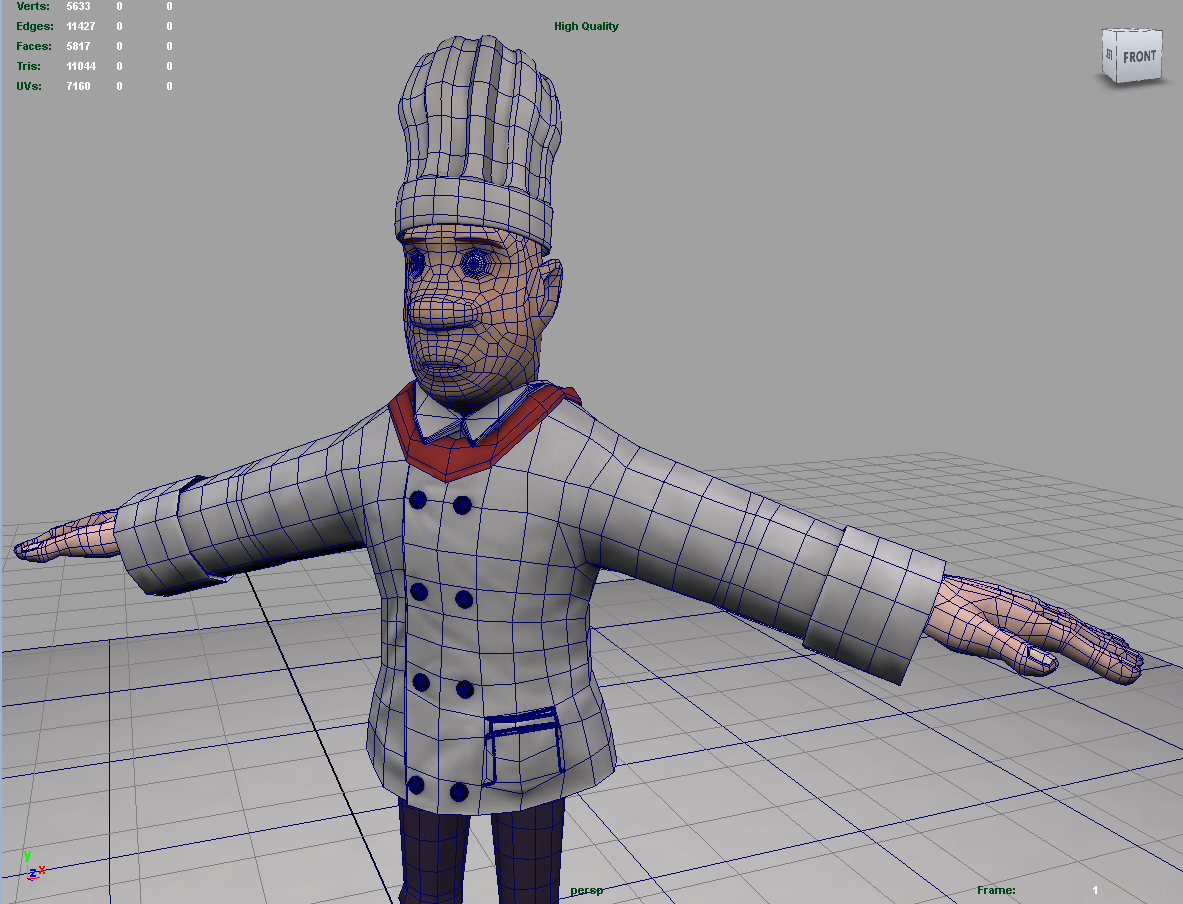
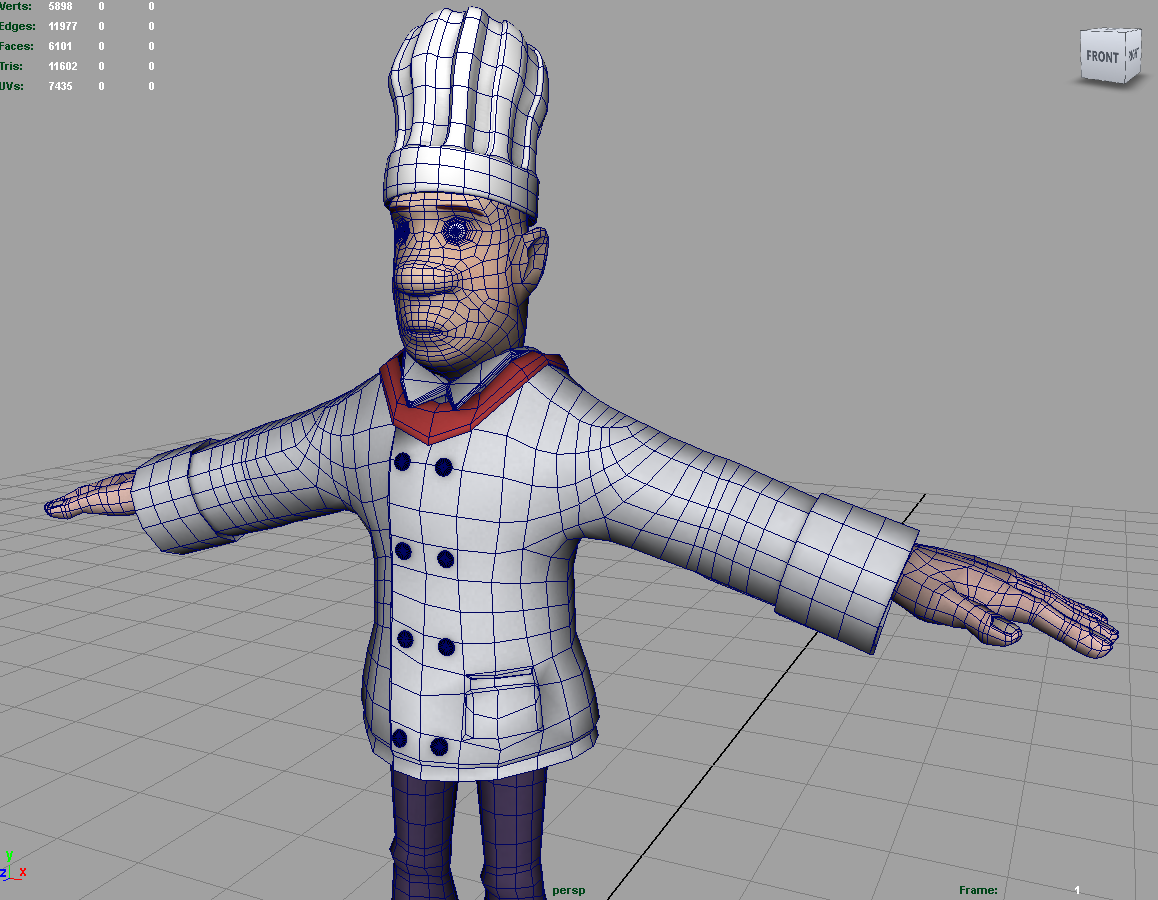
For this post I'd like to go a couple weeks back in time and show you two images of the chef as I was working on him:


I'd like you to look at the areas around his shoulder. When I was first modeling the character, my first temptation was to just take a chunk of his shoulder and extrude it straight out. That would make sense, right? Just drag out some part of his chest like a piece of play-dough and BAM! Instant arm.
The problem is that when this gets animated, this first approach fails miserably. Characters spend their time with arms down at their sides in one manner or another, so this first character's shoulders would be stretched into ugliness for a huge majority of the time.
After some sound advice from my good friend/mentor Christine, I took a much closer look at how professional characters were modeled for various game engines. Most of the geometry on these characters was modeled to roughly follow the nearby muscle groups of the character. For example, even on characters that were fully clothed, you can still make out collections of shapes that flow in the same way that pectoral muscles flow. It just makes for nicer deformations while the character moves about.
So in the end, I decided to completely rebuild his upper torso. It took a bit of reworking, but now the geometry drapes across his shoulders almost like a tunic. Now as his arms drop to their sides, the geometry of the shoulder deforms in a more natural way. And I'm pretty darned pleased with the result!
From this experience, I have adopted a rule of thumb to always try to keep large muscle groups in mind while modeling. It's not an exact rule, but it helps to avoid the pitfalls of some possibly terrible deformation down the road.
For this post I'd like to go a couple weeks back in time and show you two images of the chef as I was working on him:
I'd like you to look at the areas around his shoulder. When I was first modeling the character, my first temptation was to just take a chunk of his shoulder and extrude it straight out. That would make sense, right? Just drag out some part of his chest like a piece of play-dough and BAM! Instant arm.
The problem is that when this gets animated, this first approach fails miserably. Characters spend their time with arms down at their sides in one manner or another, so this first character's shoulders would be stretched into ugliness for a huge majority of the time.
After some sound advice from my good friend/mentor Christine, I took a much closer look at how professional characters were modeled for various game engines. Most of the geometry on these characters was modeled to roughly follow the nearby muscle groups of the character. For example, even on characters that were fully clothed, you can still make out collections of shapes that flow in the same way that pectoral muscles flow. It just makes for nicer deformations while the character moves about.
So in the end, I decided to completely rebuild his upper torso. It took a bit of reworking, but now the geometry drapes across his shoulders almost like a tunic. Now as his arms drop to their sides, the geometry of the shoulder deforms in a more natural way. And I'm pretty darned pleased with the result!
From this experience, I have adopted a rule of thumb to always try to keep large muscle groups in mind while modeling. It's not an exact rule, but it helps to avoid the pitfalls of some possibly terrible deformation down the road.
Saturday, August 7, 2010
An animatic has arrived
Well, here it is! This is a rough animatic. No sound effects, music, and only half of the proper voices. (the other half awkwardly delivered by me so we can have something to time with). The recording for this was handled by the lovely Sonja, and she will also be helping to flush out the short with proper Foley work.
From here on we will adjust the timing, start collecting sounds, and as each shot gets completed it will be spliced into the animatic. When all is said and done, we'll have roughly about 2 minutes of footage for each of the two methods my thesis is focusing around.
Monday, August 2, 2010
I futzed with 5 million polygons for this dude

I wanted to add a lot more detail to this character than was visible in the last turnaround. I could add millions of polygons into the mix and sculpt them all perfectly, but this would present a couple problems:
- Animating high-detail characters is frustratingly slow and prone to crashing everything
- Loading, transferring, or saving high-detail assets is troublesome
- The source engine has a limit to the number of polygons a single object may have
So rather than make my character cumbersome and risk breaking the source engine, I cheated. I took this character and bumped him up to about 5 million polygons. That's enough to basically murder Maya on an average computer, so I did this in ZBrush and did some sculpting there. Then stamped all that detail back onto the original low-polygon character.
The result is a 9k character that has a *similar* level of detail to the 5million character. Shadows will play across his shirt as if the folds were actually there, but in reality he's a pretty simple dude. This technique is called 'Normal Mapping' and it's been used extensively in both games and films for years.
Thursday, July 29, 2010
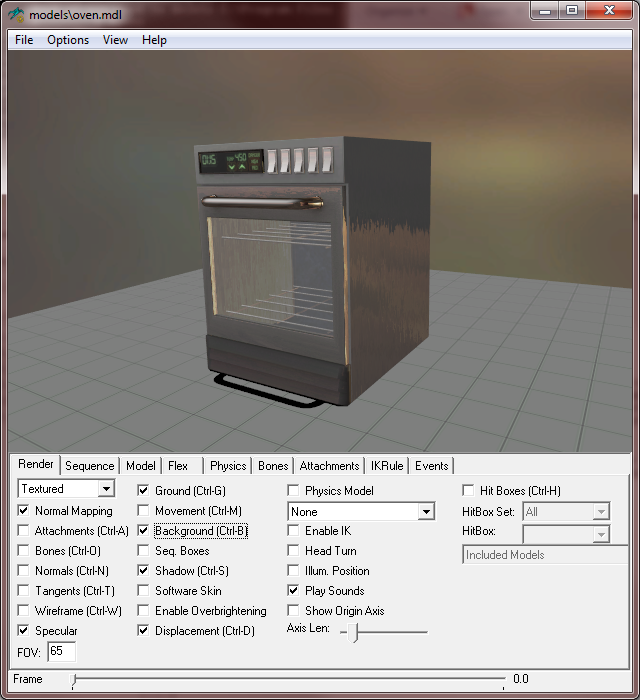
Model Progress
A sudden case of Jury Duty (hah, pun) has run me ragged for free time these past two weeks, but despite my lack of blog posting progress has been made! There are draft versions of each scene, both the office and the kitchen. Each scene is in both Maya and Source, and they both render without problems. So that's one major hurdle cleared! A lot of work remains for lighting in each scene, but a workable base exists, so I'm plowing ahead with the schedule and working on character creation now. Here is the model for character number one, the "Office Thrall". Color textures and normal maps will be forthcoming this weekend.
It's been a while since I've created a character, so I'm pretty pleased with how quickly he came together.
It's been a while since I've created a character, so I'm pretty pleased with how quickly he came together.
Monday, July 19, 2010
Supermodels? Hah! Nothing Super about them
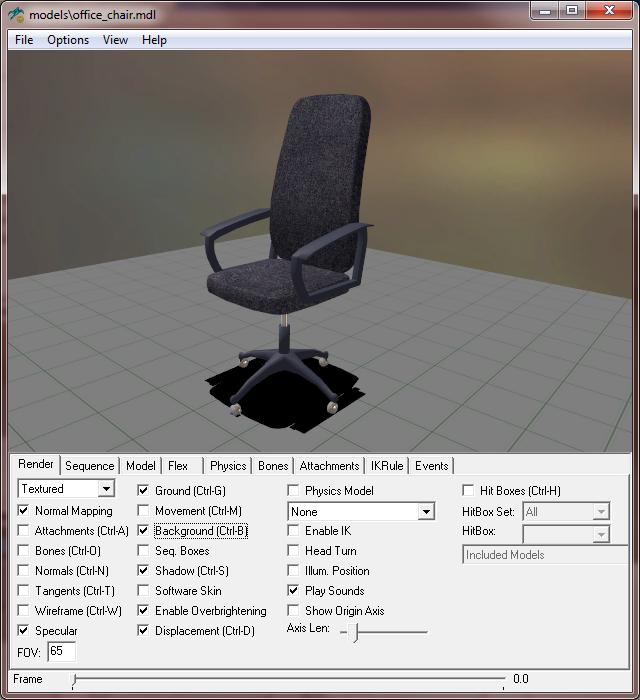
As per my earlier post, I made a grievous error when figuring how long it would take me to make the props for my scenes. With an edited timetable, I turned around and focused my efforts on getting the objects created that would be absolutely necessary. Anything that could be considered decorative I am pushing back until the animation stage of production. Decorations can be added in until right before we render, and the animations can still be done on time!
In the meanwhile, I give you a smattering of the things I've been making over the past few weeks:


In the meanwhile, I give you a smattering of the things I've been making over the past few weeks:


Wednesday, July 7, 2010
On the capturing of audio Things
My view on George Lucas is mixed. On the one hand, his achievements as a writer and producer are.... slightly questionable. On the other hand, he is somewhat of a visionary and has done great things for the entertainment industry at large. One sticking point of his, and one that I agree with strongly, is that the importance of high quality audio was/is generally ignored in film making. I once watched an interview with him where he launched a mini tirade on the subject.
It's something that has stuck with me ever since, and the idea was reinforced during my three-year stint as a student employee of my university's recording studio. Time and time again, I saw low budget films where the audio was the first thing to go, though CG effects were still on at full force. Even now, if you take a look at this year's crop of student films, and you'll see what I mean. Some of the award nominees for NYC's local festivals sound like they were recorded on a walkie talkie.
This is a pitfall that I will avoid! The Robin Danger soundtrack will be crystal clear, colored with ambience appropriate to each shot, and will be completely non-distracting to the viewer. In fact, if we do our job right, nobody will ever even notice the audio. To that end, I have enlisted the help of the enchanting Miss Sonja, a woman of many talents whose linguistic background makes her an ideal choice to be my waveform wrangler. Also to that end, I have enlisted one of the rooms in my apartment to serve as a temporary recording booth. It doesn't seem to mind.
And now, to demonstrate how professional we are being, I present to you shots from our first recording session:


Do you see that? That's a Behringer B-1 Microphone taped to a pole. Nothin' but high class here, folks. Though seriously, it might not be the Neumann U-87, but this mic packs a pretty big punch for its price. And a bunch of mattresses and spare sheets make for an excellent soundbooth. I think our audio sounds pretty swank so far. You can be the judge when the animatic comes out!
It's something that has stuck with me ever since, and the idea was reinforced during my three-year stint as a student employee of my university's recording studio. Time and time again, I saw low budget films where the audio was the first thing to go, though CG effects were still on at full force. Even now, if you take a look at this year's crop of student films, and you'll see what I mean. Some of the award nominees for NYC's local festivals sound like they were recorded on a walkie talkie.
This is a pitfall that I will avoid! The Robin Danger soundtrack will be crystal clear, colored with ambience appropriate to each shot, and will be completely non-distracting to the viewer. In fact, if we do our job right, nobody will ever even notice the audio. To that end, I have enlisted the help of the enchanting Miss Sonja, a woman of many talents whose linguistic background makes her an ideal choice to be my waveform wrangler. Also to that end, I have enlisted one of the rooms in my apartment to serve as a temporary recording booth. It doesn't seem to mind.
And now, to demonstrate how professional we are being, I present to you shots from our first recording session:

Do you see that? That's a Behringer B-1 Microphone taped to a pole. Nothin' but high class here, folks. Though seriously, it might not be the Neumann U-87, but this mic packs a pretty big punch for its price. And a bunch of mattresses and spare sheets make for an excellent soundbooth. I think our audio sounds pretty swank so far. You can be the judge when the animatic comes out!
Monday, July 5, 2010
Notes on Scheduling

As mentioned before, I assisted a fellow student in his final thesis assignment last semester. It was a great experience. In preparation for our own running of the gauntlet, my adviser asked me to share my thoughts on thesis work with the newbie students.
Without any hesitation, I noted that scheduling was key. I tried to be as broad as possible: don't use a heavy rig where a light one will suffice, don't use any new tools once production starts (stick with what you know), and try to spread out your efforts over the schedule of the project. Basically, keep the big picture in mind and remember that deadline is so named for a reason.
To that end, scheduling is vital. Plan out when you'll do what, and how long it'll take. Know where the rough spots are and try to compensate for it. Without doing that, the whole project could come grinding to a halt, especially when coordinating a team to work on it. A friend of mine offered up a well known piece of advice when I started:
"If you fail to plan, you can plan to fail"
And despite all that, and despite my own advice to others, I have totally goofed up my own schedule. I decided that I could model texture and compile three assets a day in order to have my collection of props ready by today. And while that's reasonable for someone who's doing this fulltime, it's not even close to enough time for me with my 9-5 day job.
So yeah, I dropped the ball there a little bit. I'm going to push back the schedule two weeks to compensate, and this time I'm going to prioritize. Only the essential bits are being worked on now. Assets that are decorative and wouldn't affect the animation I can work on later, while the animators work on character animation. It'll be a more efficient use of time, and it won't trip any of us up to add that in later.
I think Douglas Adams said it best, "I love deadlines. I like the whooshing sound they make as they fly by"
Saturday, June 26, 2010
I have no puns, only storyboards
So I don't have a clever title for this post. But what I lack in wit, I make up for with content! Specifically, storyboard comment! Over 70 masterly-crafted images by the talented Miss Gale. She is a college from another one of NYU's animation departments, and she is very talented!
Her sketch blog is fun to go through, so I figured she would be a natural choice for help with storyboards while I busy myself with building all the 3D assets. And, well, the results speak for themselves.
The full boards can be found here. Below is a snippet of the awesomeness:


Her sketch blog is fun to go through, so I figured she would be a natural choice for help with storyboards while I busy myself with building all the 3D assets. And, well, the results speak for themselves.
The full boards can be found here. Below is a snippet of the awesomeness:


Thursday, June 24, 2010
What a novel conept
The storyboards just came in, and I think they're just awesome. Along with the script, the storyboard artist was given some light notes on shot preference and a few concept sketches of what the characters will look like. See those below! Tomorrow we will unveil the boards to the world (wide web) and the animatic will soon follow.
On another note, my schedule has each night this week budgeted for three props being modeled. I'm not quite sure which magical fairytale universe I picked that rate from, because at my best after working all day at my day job, I can do no more than two, usually one and a half. Here is a lesson learned: When working with new tech, do a few dry runs of each step before setting up a schedule.
But the good news is that the props are working, and are functional in both maya/mentalRay and source.


Monday, June 21, 2010
Modelling Commences!
Concept sketches and the storyboard will be posted soon, but in the meanwhile you might notice that the schdule mentions today is the start of prop modelling. Well, I'm sticking to this schedule as best I can, so today it starts! The first prop was mostly an exercise to make sure I could convert an object between Maya/MentalRay and Source. I've already gone through the process before, but today served as a refresher, since there was a couple steps I forgot to write down last time!
Anyway, after a few more educational moments, we have our first movie prop, a wooden spoon! It's got an attachment for the character to grab on to, levels of detail to save on rendering time when it's far away from the camera, a physics mesh for in-engine dynamics, and a shiny lacquer polish to keep all your meals freshly stirred and delicious.
It's being held by a character from one of Valve Software's Games for size reference

Saturday, June 19, 2010
Barrels Collapsing in the Unreal Engine
I'm about to post some concept sketches for my project, but before that let me point out this video. It's a small physics test that user "Elude" made to demonstrate a 25,000 barrel stack collapsing on itself.
I couldn't think of a better way to illustrate the benefits of a game engine over a 3d production tool. Running a physics simulation for that many objects at the same time would bring Maya to a screaming halt on the best of days. And splitting it up into smaller bits using the same program would be a time-consuming process. Using the engine's phsyics and rendering capabilities, not only is this feasible, but the creator is able to interactively control his camera as well.
He gives a brief summary of his method here: [epic games blog] but the short of it is that he recorded his computer's output using a program called FRAPS to capture the video as the game engine crunches away. All in all, it took about two and a half seconds to render a full frame. I have very strong doubts that this could be accomplished with both simulation and rendering in that time frame using maya/mental ray.
Score another point for hardware rendering!
Thursday, May 27, 2010
MacOSX commercial in source!
As the schedule will show, I'm currently hashing out character concepts for the short. Those will appear here soon! But in the meantime, I had to share this:
Those of you who are older (or those of you who are trivia buffs) will recognize this as a spoof on the classic Macintosh 1984 Commercial. Like other videos made by Valve Software, this is a commercial for one of their products and is done entirely within the source engine. Notice the light fog, dept of field (most visible in the audience) motion blur, and all that other jazz that I've pointed out before.
Those of you who are older (or those of you who are trivia buffs) will recognize this as a spoof on the classic Macintosh 1984 Commercial. Like other videos made by Valve Software, this is a commercial for one of their products and is done entirely within the source engine. Notice the light fog, dept of field (most visible in the audience) motion blur, and all that other jazz that I've pointed out before.
Friday, May 21, 2010
Why didn't you list that among our assets?
In order to make the project schedule, I needed to figure out how many things had to be created, and how long each would take. And of course, the script was needed before either of those! Below is our script and my current best-guest list for the things that need making:
As is standard practice, we'll be making all this stuff in pre-production (myself as a modeler, and Sonja as the audio wizard), before the full-on film-making gets underway. In a full studio environment, that would mean that we get to avoid the expensive animators and rendering folk until later. But since this is not a professional project, it just means that I'm avoiding bothering otherwise-expensive animators until I'm sure that they have all their tools ready to rock and roll.
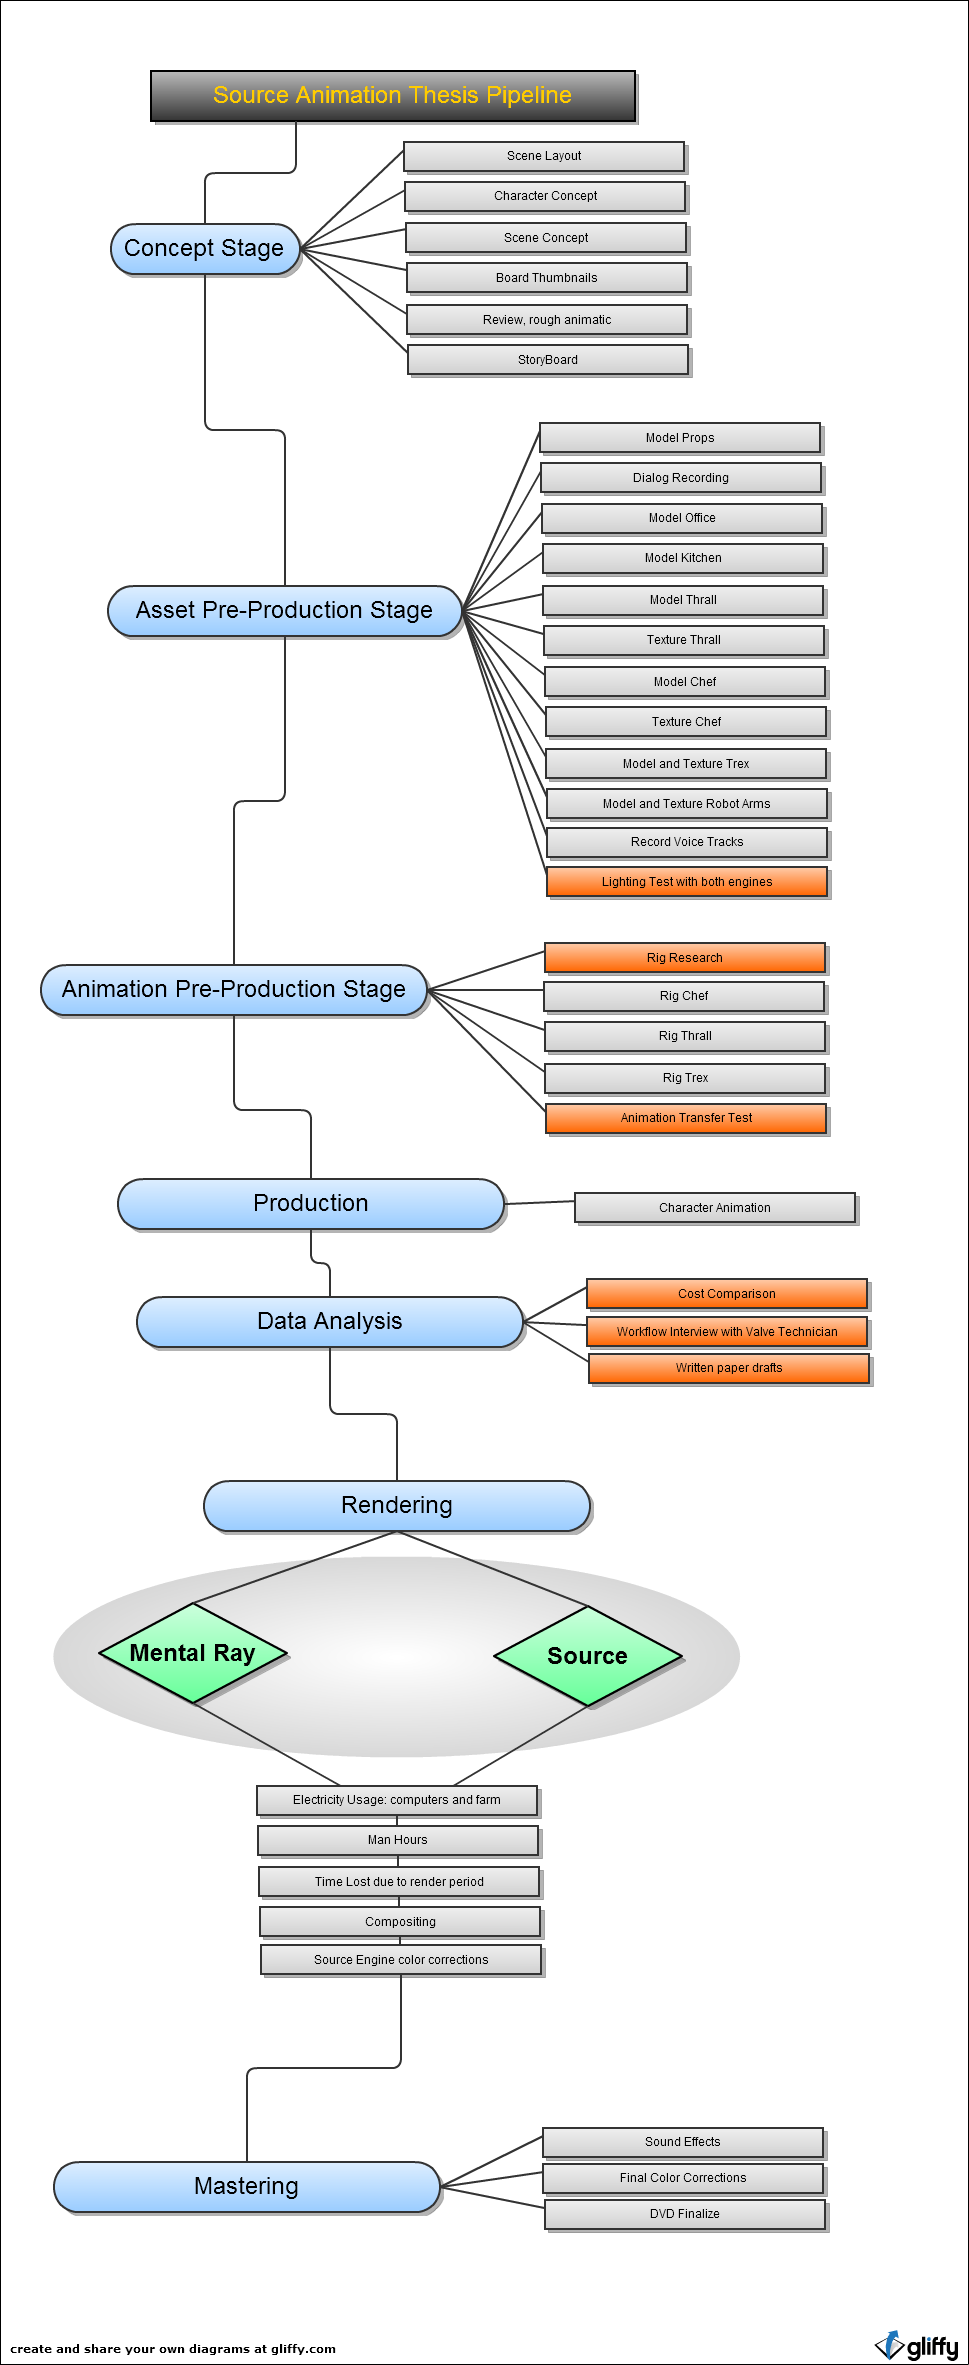
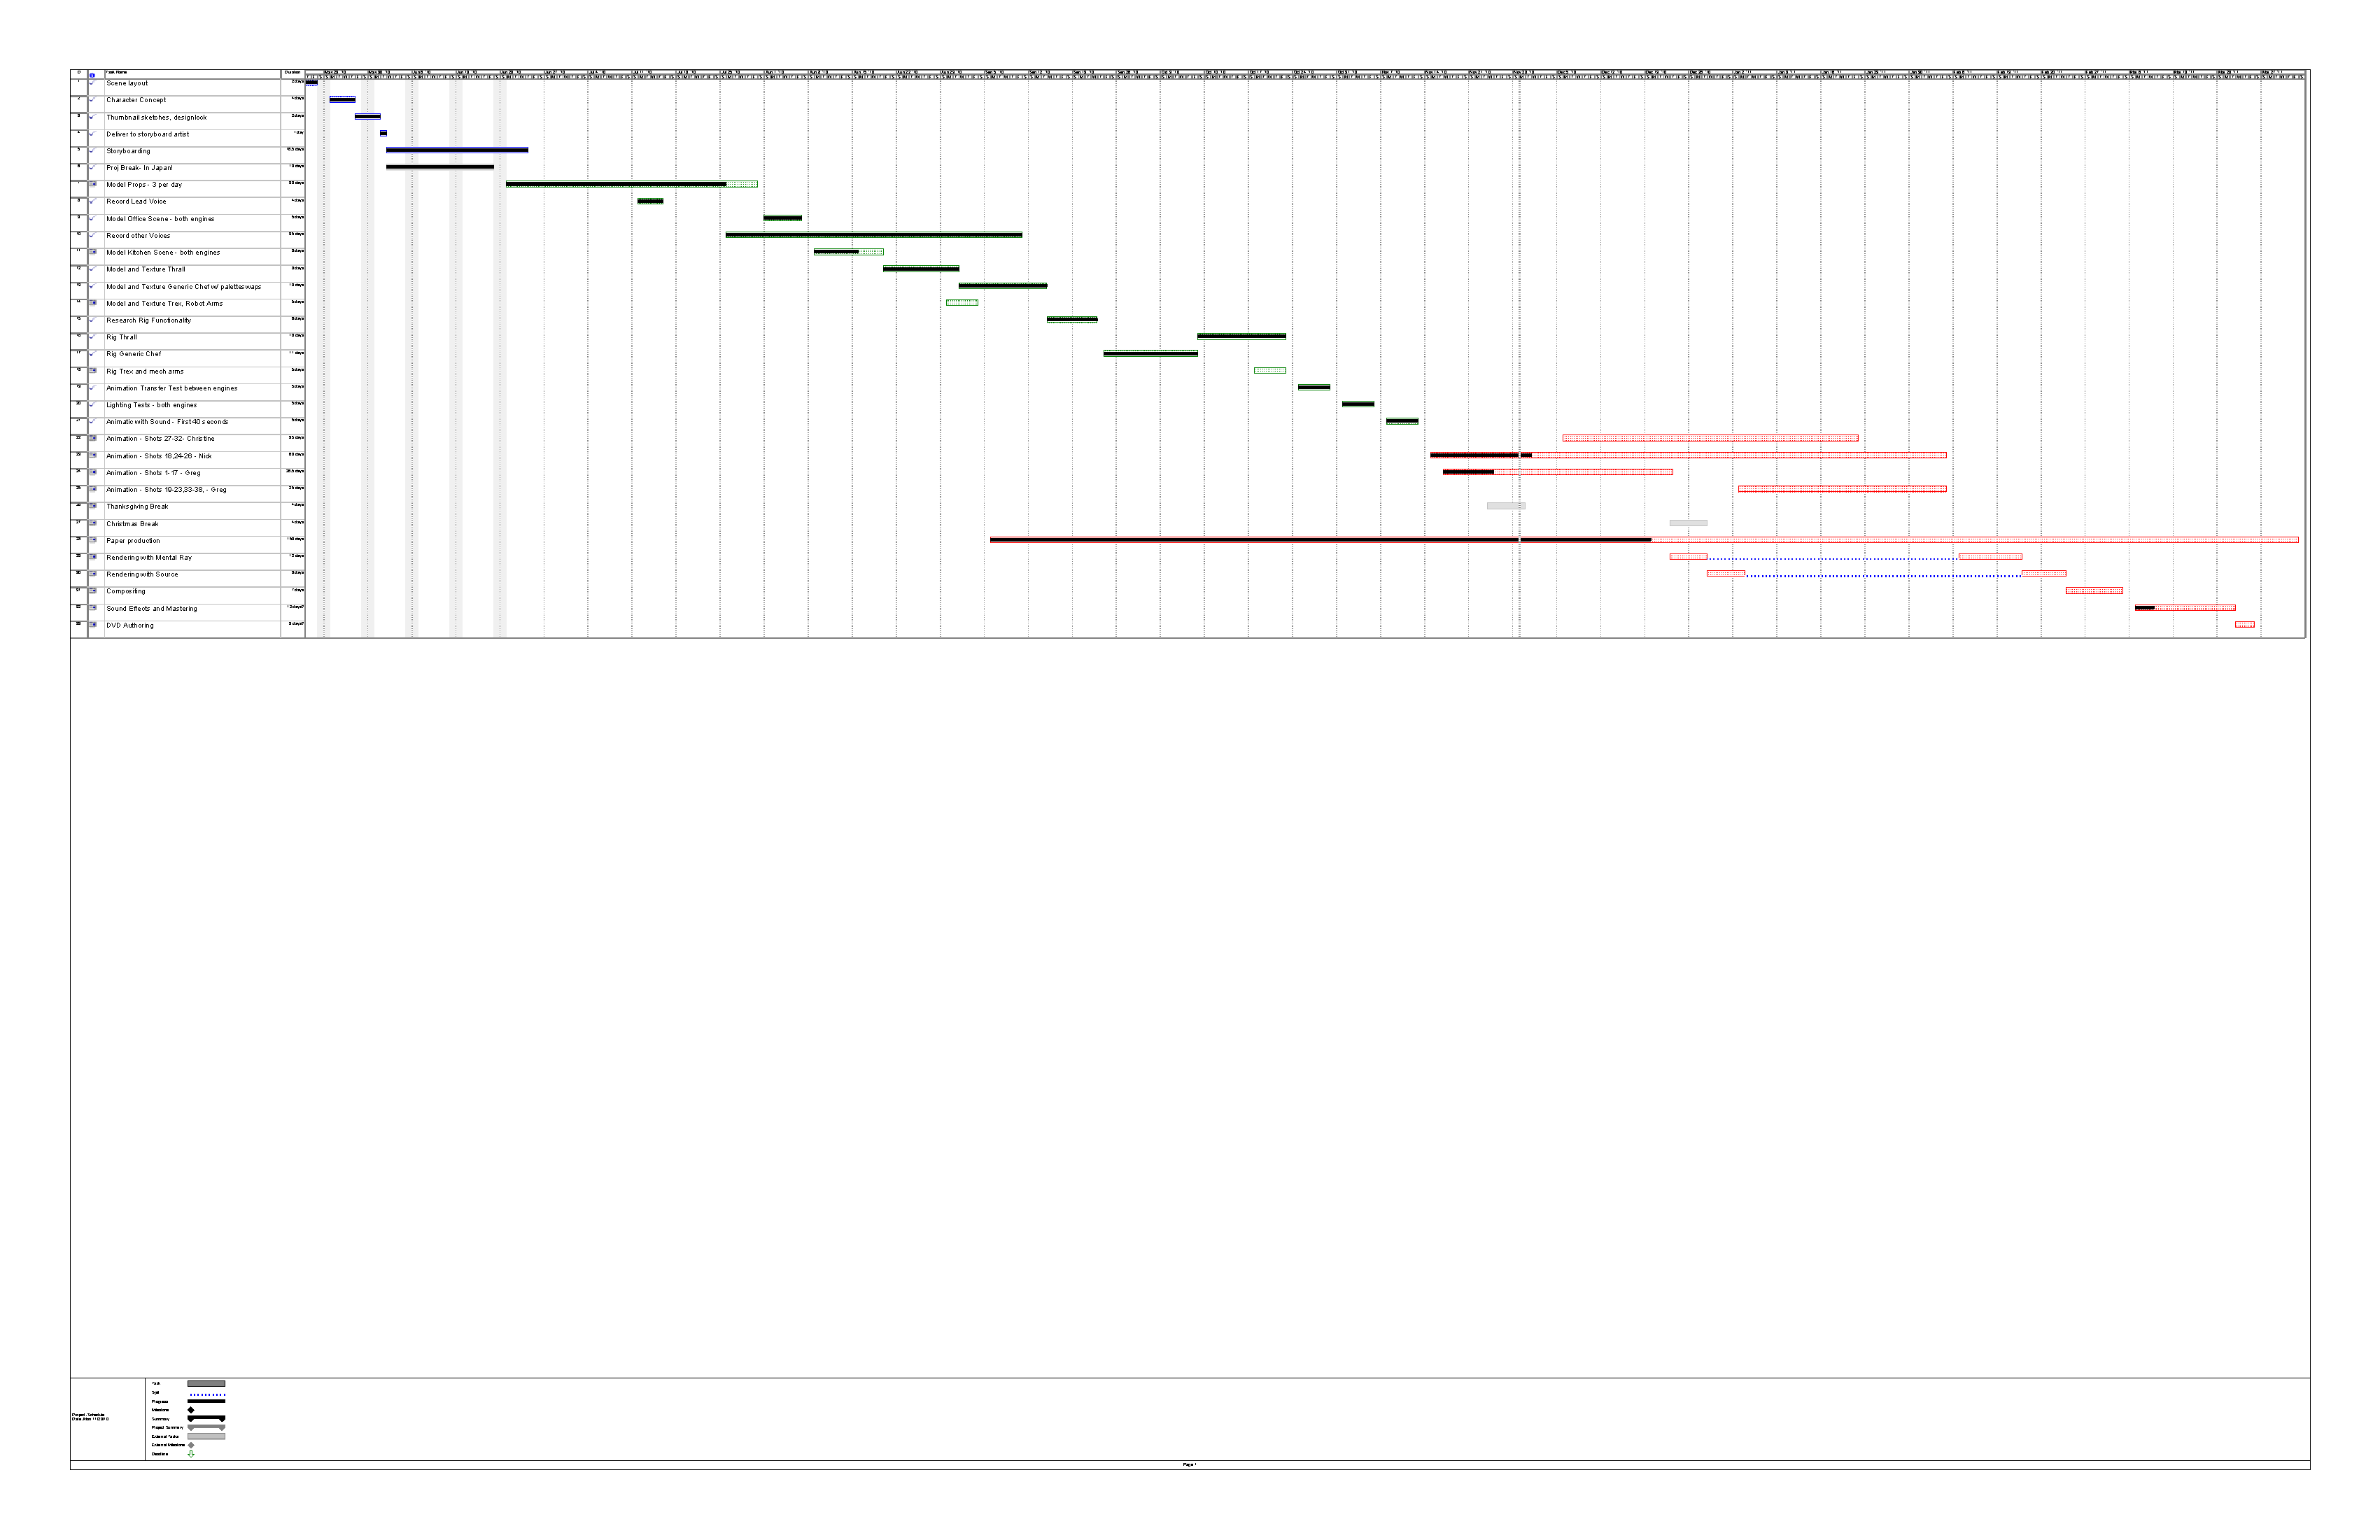
Below is a diagram I have up on my wall. As we complete each major step, I'm ticking them off and recording info about each.

As is standard practice, we'll be making all this stuff in pre-production (myself as a modeler, and Sonja as the audio wizard), before the full-on film-making gets underway. In a full studio environment, that would mean that we get to avoid the expensive animators and rendering folk until later. But since this is not a professional project, it just means that I'm avoiding bothering otherwise-expensive animators until I'm sure that they have all their tools ready to rock and roll.
Below is a diagram I have up on my wall. As we complete each major step, I'm ticking them off and recording info about each.
Thursday, May 20, 2010
Back on Track
I believe my previous posts have fairly solidified my claim. Hardware-based rendering is (at least in some scenarios) a viable tool. Now I will shift from talking about general examples to the specific details of my project.
Firstly, I ought to explain that this blog has been delayed over the past two months. I was forced to lay aside my own project while assisting a friend finish his 2010 thesis project. It can be found here. I did the animation for the main character, which was good practice for me and helpful for him, since he was focusing on the effects side of the piece. Anyway, now that this is done, I can return to my own goals with full effort.
As mentioned before, I'm going to produce the same short twice, once for each engine, and then measure the results. With the help of my friend and collegue Alex, an extremely talented wordsmith, the script for the faux-commercial "Robin Danger Action School of Culinary Excellence" has been hammered into place. It makes me chuckle to read it, but in order to pull it off, I must create:
So let's get started!
(a schedule of production can be found here)

Firstly, I ought to explain that this blog has been delayed over the past two months. I was forced to lay aside my own project while assisting a friend finish his 2010 thesis project. It can be found here. I did the animation for the main character, which was good practice for me and helpful for him, since he was focusing on the effects side of the piece. Anyway, now that this is done, I can return to my own goals with full effort.
As mentioned before, I'm going to produce the same short twice, once for each engine, and then measure the results. With the help of my friend and collegue Alex, an extremely talented wordsmith, the script for the faux-commercial "Robin Danger Action School of Culinary Excellence" has been hammered into place. It makes me chuckle to read it, but in order to pull it off, I must create:
- 4 rigged characters (1 with multiple pallette swaps)
- 2 Scenes (each created in two separate engines)
- 6 Voices
- 29 Props
- 27 Sound Effects
So let's get started!
(a schedule of production can be found here)
Sunday, April 25, 2010
Crystal Tools: the engine that wasn't supposed to be
I touched on FFXIII in my second post, where I compared software rendering to hardware rendering. The Final Fantasy series, as I mentioned, is well known for using pre-rendered(software) cutscenes throughout their games to give the player a little added entertainment. It would be unfair of me not to mention their "Crystal Tools" engine, which handles all parts of the game that are not done with pre-rendered cutscenes.
SquareEnix started this engine about 4 years ago to take full advantage of the hardware graphics abilities of the Playstation3 console. This engine is so powerful that many players can not actually tell what the difference is between pre-rendered and real-time graphics. Some fans are even arguing (incorrectly) that this project doesn't even use pre-rendered videos.
Mis-informed fandom aside, this is just another point to my argument that hardware rendering has reached a point where the common audience member can't tell the difference. There is a difference still, but to really see it you need to give what you're looking at a close inspection:
Pre-rendered image, capture courtesy of the Eurogamer Website:

Real-time image, capture courtesy of the Eurogamer Website:

Notice the difference in the appearance of hair's smoothness and transparency, and the nicer anti-aliasing of the latter image. Also notice the more varied lighting and softer shadows. They are noticeable here on still images, but when you watch the project's 2009 trailer, can you spot the places where they switch between software and hardware? It happens at least 4 times in the first minute alone.
The above images come from an article on Eurogamer that mostly compares graphical differences between the Xbox and Playstation versions of the same project. You can read through this article if you like, but the differences between various types of hardware is beyond the scope of my thesis. I am focusing on PC-based hardware rendering, because I want to expose the necessary tools to do so and enable other animators to make use of them. Console environments such as the PS3 or Xbox are too restrictive to allow fo the custom animations and assets that most animation projects would be looking for.
Here is also another article that discusses the game, and towards the end mentions which software tools they opted to use for this project.
Saturday, March 13, 2010
Technical Geekery: Techniques in Source Videos
In my last post I promised I would explain a little about what's so special in those videos that I linked to. Sure they're enjoyable, but what's the big deal? Well, when I first approached my adviser with this topic, I was told that some of the limitations of a game engine might hobble the project. Specifically stuff with reflections, refractions, soft shadowing, and other such things that light does in the real world.
As it turns out, that's not the case! See the images below for examples of almost all of these features that are used in the videos you just saw in my last post:
1) Reflection of the environment in his glasses. This is cheated, it's not a true reflection, but can you really tell the difference? Motion blur on any fast-moving objects is a must, and the soft shadows that you see here on his arm is visible all over the video.

2)This is a true reflection. The same effect is used for water surfaces in the engine. It's an expensive effect, but obviously not a bank breaker!

3)Light bloom and HDR. The source engine now supports a greater range of colors than the eye can see, and it varies screen exposure to mimic the human eye's attempts to compensate for lighting conditions. HDR is a topic that deserves it's own research, so let's just accept that it's part of our arsenal here and move on.

4)Dynamics and particles! Through the use of particles and sprites, the source engine contains a powerful effects system that can be used for various effects, explosions, weather, and more.

5)Depth of Field is a side-effect of our standard camera optics, and many film-makers use this to their advantage to help focus the audience's eye. In this scene, the people behind this video did exactly that, keeping the old man in focus while he examines something in the foreground.

Tuesday, March 9, 2010
Proof in the Pudding: Source-made Videos
On the last episode of dragonball-Z, I showed a couple examples of current game trailers and explained how hardware and software rendering are starting to become indistinguishable. Well, enough talk! Let's see some examples here of what can be done without weighty software rendering:
Click here for Valve's repository of videos made with source
A couple of the videos I would like to highlight. First being the trailer for their project titled "Left 4 Dead", a post-apocalyptic zombie survival game.
And next is "Meet the Sniper" and introductory video for one of the characters for their project titled "Team Fortress 2". Valve has heavily documented TF2's creation process, so I will be discussing it in far greater detail in later posts. But for now, simply take a look at a non-photo-real style animation:
This latter example is what I will be most interested in. My personal preference is for movies that learn towards stylistic design as opposed to realistic design. I feel that NPR stories allow filmmakers to focus more on story and less on avoiding uncanny valley. This is merely a matter of personal preference. But a quick look at this years oscar nominations (and winners) shows that great animations can be made without striving for ultra-realism.
And now I will step off my NPR soapbox and show a third video, one of the most recent (and longest) videos made with the Source Engine, introducing another character from TF2. Watch and enjoy now, in the next post I will point out a few things that you may not have noticed about these videos, and why they're so nifty.
Saturday, February 20, 2010
Inspiration and Examples - Current Real-time Trailers
The inspiration for this project came out of a discussion I had while watching promotional videos for various games being released this year. I noticed some used pre-rendered sequences, and others used actual in-game footage. The notable part here is that while discussing the videos, I found out that my companion was not sure if what we had seen was in-game or pre-rendered. In short, the difference in quality was small enough to give room for doubt here. This struck me, because the video with pre-rendered scenes was doubtlessly more expensive to produce. If most of their audience can't tell the difference, why spend all the extra money on content creation? And furthermore, why spend money on content that won't even be in the final product, if scenes from the actual product can be just as entertaining?
Below are two example videos that show the difference between software and hardware rendering in practice:
One is for Final Fantasy 13, a game produced by SquareEnix. This company makes beautiful pre-rendered sequences to go with its games, both during gameplay and in commercials for the product. They are known for making use of Mental Ray for their pre-rendered videos, and offering up cut-scenes of these videos when characters interact. These cutscenes, such as the one below, show the benefits and capabilities of software rendering. This will also provide a good contrast for the next video, which takes the opposite approach.
And below is a promotional video for Mass Effect 2, a game created by company Bioware using the Unreal engine. This video was displayed during a leadup match to the superbowl this year and it caught my eye for two reasons. One: it was quite long, clocking in at two minutes compared to the usual 30 second commercial spot. Two: it appears to use only in-game footage. For such an expensive ad slot, I was surprised to see them use this method and to pull it off well.
Watching these two trailers back to back, it's possible to spot the differences in quality if you know what to look for. You might see it even clearer if you watch each in HD, which at the time of writing is an option on these links. But as mentioned before, not everyone can spot the differences. The gap between hardware and software is much smaller than it used to be, and the gap is shrinking.
Monday, February 15, 2010
Title Crawl: Introduction to the thesis
- Catastrophe! This thesis project has been made obsolete by the release of Mental Image's iray product. Unfortunately for me, this came to light about halfway through the project. The post below is unedited, so I can look back on this later. But to see the new direction my thesis has taken, replace the below post with this one.
Subscribe to:
Posts (Atom)