So I now have a draft version of the pre-production book, otherwise known as a thesis paper. You can find a link to that above, on this blog's header! (Also in the thesis documents link to the right)
As it turns out, I wont have to write as much of a paper as I thought. The program I'm in has rather strict definitions of what constitutes research and paper writing in general. While I will still have to abide by academic standards and MLA citation and all that, there will be less verbosity and more... well, visual stuff. The slightly rigid definitions of the paper also cover my general thesis statement as well. I was directed to create a two part statement that listed a) the creative aspect of my project and b) the technical aspect of it.
What I have now in the paper is what suits my advisers best. But the edited statement made in my last post is what I feel a more accurate description of where this all is going. So I sort of have two thesis statements now. Awesome. I will eventually convince my advisers to let me merge the two, but like all things at NYU, that will be a slow process.
In the meantime, look at the pretty flash version of the WIP paper! It's made using indesign, and the whole project will be entirely digital. (you're welcome, trees) It contains a the latest version of the storyboard, where I reordered a couple frames and trimmed a couple others for time considerations. At the end, it has a shot list, where I break down each of the shots of this project and what each will entail. As you can see, a chunk of the animator spaces are empty. As soon as I can figure out which of my generous animator friends can do which, that will be filled in. And then this party will really get started!
Saturday, September 25, 2010
Thursday, September 23, 2010
In which my thesis project steps sideways
I thought my driving thesis idea was pretty solid. So, too, did most of the folk I told about it. It just seems smart, to harness all this powerful technology to help us do what we've always done, but faster.
As it turns out, Mental Images, the folk behind mental ray, thought so too. In fact, they thought so before I ever did, and went about making a product to do just that. It was recently announced, it exists and it's called iray.
There are caveats to using it. You need a professional card to use it, and it isn't yet implemented into many of the 3D software packages out there. I haven't actually seen this used in person yet.
But it exists.
That kind of takes the wind out of my sails, doesn't it? On the one hand, I feel like a smart little nerd for coming up with a concept that was also developed by smart folk that do this sort of thing for a living. But on the other hand, well, I don't have much to prove anymore. I must have been *close* to being right, or Mental Images would have never gone through the expense of making the iray product.
I could still make the argument and say that hey, using game engine tools makes animation even cheaper and available to the masses! (game engines are free or cheap, professional hardware is quite expensive) Just going through the videos I've posted here before has shown how this technology is up to snuff. If it's good enough for broadcast TV, it's good enough to be considered professional quality! And a few seconds of poking through youtube will show you a veritable army of people that are attempting to make machinima using these easy-to-get tools.
So henceforth, my thesis project is now:
So I'm no longer trying to prove the 'hardware versus software' debate. Those forces have been joined and the battle there is over. But in the words of my friend Alex, I don't need to prove that anyone should be doing anything. Instead I am going to point out that these tools exist, and can be used to make stuff that meets professional standards.
And we're going to prove it by making high-quality-awesome-things with said tools.
As it turns out, Mental Images, the folk behind mental ray, thought so too. In fact, they thought so before I ever did, and went about making a product to do just that. It was recently announced, it exists and it's called iray.
There are caveats to using it. You need a professional card to use it, and it isn't yet implemented into many of the 3D software packages out there. I haven't actually seen this used in person yet.
But it exists.
That kind of takes the wind out of my sails, doesn't it? On the one hand, I feel like a smart little nerd for coming up with a concept that was also developed by smart folk that do this sort of thing for a living. But on the other hand, well, I don't have much to prove anymore. I must have been *close* to being right, or Mental Images would have never gone through the expense of making the iray product.
I could still make the argument and say that hey, using game engine tools makes animation even cheaper and available to the masses! (game engines are free or cheap, professional hardware is quite expensive) Just going through the videos I've posted here before has shown how this technology is up to snuff. If it's good enough for broadcast TV, it's good enough to be considered professional quality! And a few seconds of poking through youtube will show you a veritable army of people that are attempting to make machinima using these easy-to-get tools.
So henceforth, my thesis project is now:
I will demonstrate how high-quality animated entertainment can be produced via readily available game engine tools, such as the Source engine by Valve Software
So I'm no longer trying to prove the 'hardware versus software' debate. Those forces have been joined and the battle there is over. But in the words of my friend Alex, I don't need to prove that anyone should be doing anything. Instead I am going to point out that these tools exist, and can be used to make stuff that meets professional standards.
And we're going to prove it by making high-quality-awesome-things with said tools.
Sunday, September 19, 2010
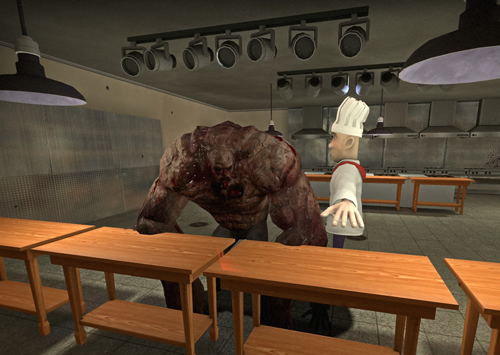
This chef did nothing to help me
This chef just stood by while a huge zombie tore up my kitchen and killed my film crew.What a terrible day that was.
...If I'm going to be making an animation in a game engine, I can't help but goof around a little every now and then, so while I'm testing out my two scenes for the short (the office and the kitchen) every now and then I fill them with zombies:

But silliness aside, I have successfully tested out a way to load up my characters into the engine, and display animation. That leaves one last hurdle: recording video from the engine. There are tutorials on this topic online, so that will hopefully be an easy test. Then it's onward to producing the actual animation for the short!
At this point, I am wrapping up the pre-production aspect of the project and beginning production in earnest. This puts me almost an entire semester ahead of the game, because my pre-production class just started this past week. As mentioned before, I started early because this is an ambitious project and I want to be absolutely sure to finish on time. Using and learning new tools makes any production a bit difficult, and subject to learning-curve delays. I'm happy to look back on the past several months and see that I was able to mostly stick to my schedule, and stick to my guns to get so much done.
I did hit one major snag this past week, but it was not a technical issue as much as it was a general thesis issue. So that deserves its own post, which will be next!
...If I'm going to be making an animation in a game engine, I can't help but goof around a little every now and then, so while I'm testing out my two scenes for the short (the office and the kitchen) every now and then I fill them with zombies:
But silliness aside, I have successfully tested out a way to load up my characters into the engine, and display animation. That leaves one last hurdle: recording video from the engine. There are tutorials on this topic online, so that will hopefully be an easy test. Then it's onward to producing the actual animation for the short!
At this point, I am wrapping up the pre-production aspect of the project and beginning production in earnest. This puts me almost an entire semester ahead of the game, because my pre-production class just started this past week. As mentioned before, I started early because this is an ambitious project and I want to be absolutely sure to finish on time. Using and learning new tools makes any production a bit difficult, and subject to learning-curve delays. I'm happy to look back on the past several months and see that I was able to mostly stick to my schedule, and stick to my guns to get so much done.
I did hit one major snag this past week, but it was not a technical issue as much as it was a general thesis issue. So that deserves its own post, which will be next!
Thursday, September 16, 2010
Joint-Based Face Rig - Part 5: Loose Lips Sink Ships
The joints around the mouth are the bit of this joint-based rig that gave me the most trouble. The mouth is an awfully complex series of... things. Fortunately, I am not the first person to make a bone-based face! Once again, with the kindness of professionals in the field, I have navigated these treacherous waters.
So how to do it? Place a ring of bones around the lips, just inside the skin and slightly deep into the lip itself. If you put the joint on the edge of the lip, you wouldn't be able to rotate it and get a nice lip purse. The number of bones you place in a ring is dependent on how detailed you want to get. Will this character have closeups? You'll need a bunch. If not, three on top and three on the bottom would work.
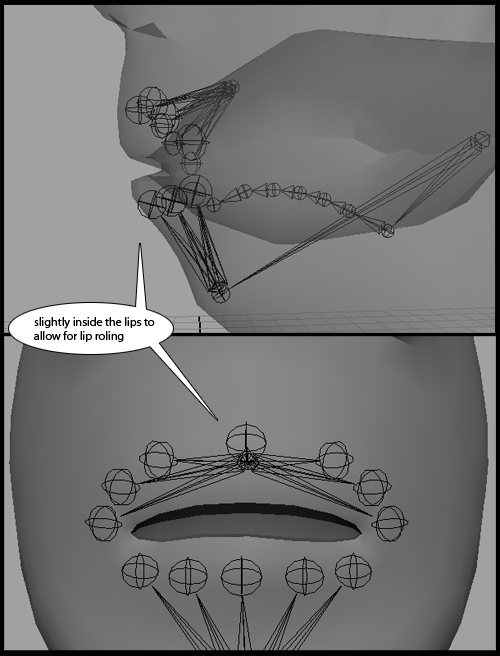
It will be helpful if you can add one more joint after each of these, to help orient the lip joints. These would ideally be right on the edge of the lip, and otherwise ignored. I could not do this on my setup, because I am right up against the max joint limit per characters, but it would have saved me some time in orienting these buggers.
As for the tongue, a simple chain of joints will do the trick. And that concludes the face tutorial. You can do other bits like the nose and ears, but the basics are all there. Once these bones are nicely skinned to the face, you can build a rig on them and move them as you see fit. I chose to make a series of Set Driven Keys to move the lips into common poses for lip-synching.
If you would like to see an example of what I mean, here is the same file that I linked in part 1, only this time it has all the rig controls built on top of the basic skeleton. This is fairly close to what I'm actually using in my animated short. You are free to take this and mess around with it, but please don't sell my stuff.

The above maya project file is licensed under a Creative Commons nonCommercial Liscence.
Click on the link for details.
So how to do it? Place a ring of bones around the lips, just inside the skin and slightly deep into the lip itself. If you put the joint on the edge of the lip, you wouldn't be able to rotate it and get a nice lip purse. The number of bones you place in a ring is dependent on how detailed you want to get. Will this character have closeups? You'll need a bunch. If not, three on top and three on the bottom would work.

It will be helpful if you can add one more joint after each of these, to help orient the lip joints. These would ideally be right on the edge of the lip, and otherwise ignored. I could not do this on my setup, because I am right up against the max joint limit per characters, but it would have saved me some time in orienting these buggers.
As for the tongue, a simple chain of joints will do the trick. And that concludes the face tutorial. You can do other bits like the nose and ears, but the basics are all there. Once these bones are nicely skinned to the face, you can build a rig on them and move them as you see fit. I chose to make a series of Set Driven Keys to move the lips into common poses for lip-synching.
If you would like to see an example of what I mean, here is the same file that I linked in part 1, only this time it has all the rig controls built on top of the basic skeleton. This is fairly close to what I'm actually using in my animated short. You are free to take this and mess around with it, but please don't sell my stuff.
The above maya project file is licensed under a Creative Commons nonCommercial Liscence.
Click on the link for details.
Monday, September 13, 2010
Joint-Based Face Rig - Part 4: Turn the other cheek
I've been told that this blog is getting hard to read for the layman. I'm sorry! I wanted to go into some detail on the face rig part, because it presented such a huge problem to me. We'll go back to regular things after the next post.
As for cheeks, they were just as easy as the eyes. The face moves with the eyes, and the cheeks are another often-overlooked part of facial animation. Do you want your character to look half-dead? Then by all means, ignore the cheeks.
If you want to add a little more to the pot, then a simple triangle of joints on each cheek will suffice. One under the eye for squints, one on the outer cheek, and one outside the naso-labial fold.

And that's all I have to say about that.
Thursday, September 9, 2010
Joint-Based Face Rig - Part 3: Eyes on the Prize
The eyes were easy.
And they shouldn't be. The eyes are the window to the soul, as they say, and that is where the audience will spend most its time looking. To that effect, eyes deserve all sorts of wonderful deformers to allow them the greatest range of expression possible. For much the same reason for other parts of the rig, this simply can't be done with a game engine (yet).

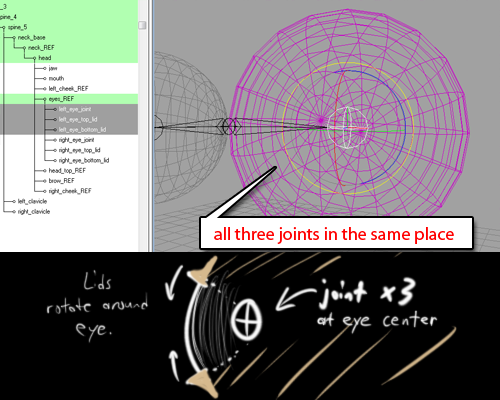
But we can cheat it very nicely :) My approach to the eyes was as straightforward as they come. I plopped a joint right smack in the middle of the eye, and bound the eye to that. The eye rotates along with the joint at its center, and all is right with the world.
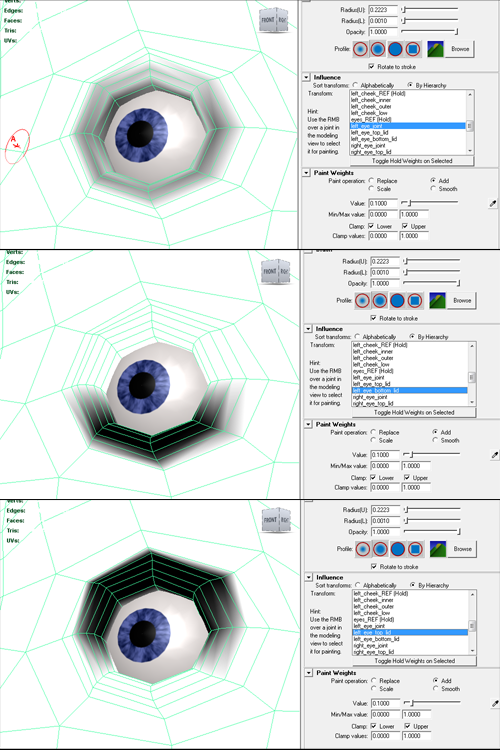
What about eyelids? Well, for those I just duplicated the eyeball joint twice. One for the top and one for the bottom eyelids. Then I painted the weights of the joints on the skin around the eyes veeeeeery slowly, testing every few strokes to make sure I had a good balance. I took a screenshot of my weightings to give an example. The weight display is inverted and clamped to be easily visible! In actuality, the weighting appears very muted and gray because of how I spread it out around the eye.

You'll notice up above I have a third image as well. To add just a touch more believability, I shared a little bit of the skins weighting with the original eyeball joint. That way, as the eye looks around, it sort of snags the skin around it. It's not much, but it does add a bit of life to the character.
And they shouldn't be. The eyes are the window to the soul, as they say, and that is where the audience will spend most its time looking. To that effect, eyes deserve all sorts of wonderful deformers to allow them the greatest range of expression possible. For much the same reason for other parts of the rig, this simply can't be done with a game engine (yet).
But we can cheat it very nicely :) My approach to the eyes was as straightforward as they come. I plopped a joint right smack in the middle of the eye, and bound the eye to that. The eye rotates along with the joint at its center, and all is right with the world.
What about eyelids? Well, for those I just duplicated the eyeball joint twice. One for the top and one for the bottom eyelids. Then I painted the weights of the joints on the skin around the eyes veeeeeery slowly, testing every few strokes to make sure I had a good balance. I took a screenshot of my weightings to give an example. The weight display is inverted and clamped to be easily visible! In actuality, the weighting appears very muted and gray because of how I spread it out around the eye.
You'll notice up above I have a third image as well. To add just a touch more believability, I shared a little bit of the skins weighting with the original eyeball joint. That way, as the eye looks around, it sort of snags the skin around it. It's not much, but it does add a bit of life to the character.
Tuesday, September 7, 2010
Joint-Based Face Rig - Part 2: Brow-beater
My approach to rigging up the face using only bones is very simple:

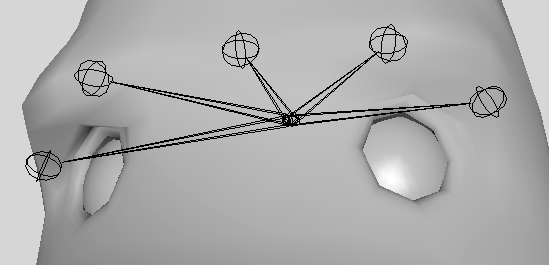
Any seasoned animator will tell you that the whole brow is connected as if it were a giant curve; when one side is pushed into a position, the other side is pulled over in response. Several of the tutorials I discovered used this as a basis for their rigs. I want to emulate that curve-like behavior, but Source does not support curves as deformers, only joints. This leaves me with two options: figure out a way to make joints attach themselves to a curve (but leave them adjustable for animation), or manually animate each and every joint to mimick curve-like behavior. Neither of those sound like very fun options.
My solution in a common tool used by animators called a pose manager. Rather than make an uber complex setup that limits the movement of the character's brow, I simple make a row of joints that span the brow, weight them in a very smooth gradient between each other, and use a pose manager to create the simple brow shapes that an animator can work with.

This prevents the need for complex curve-mimicking setups, and allows the animator to retain full control. I used five brow joints in the characters for this project. After some especially helpful advice from a veteran rigger, I have them all grouped under a non-used joint called Brow_REF, and that joint is connected back to the main head joint. Using empty "reference" joints like this can be a huge relief. It helps to keep the face neatly organized, and it only takes a few seconds to lock it down while you are skinning the weights.

- Create enough bones to cover the entire face, with enough detail for areas of interest (eyes, mouth)
- Skin those bones so that they pleasantly deform the face
- Attach a series of animator controls to those bones to drive their motion
- Brow (covered in this post)
- Eyes (covered in part 3)
- Cheeck/Nose (covered in part 4)
- Mouth (covered in part 5)
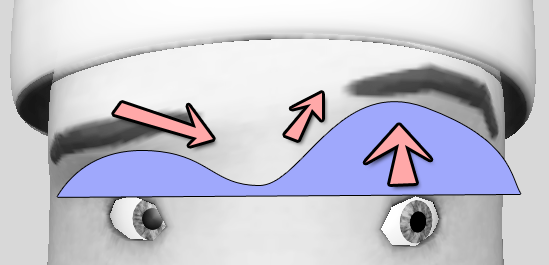
The whole brow is connected. Movement on one side will pull at the other
Any seasoned animator will tell you that the whole brow is connected as if it were a giant curve; when one side is pushed into a position, the other side is pulled over in response. Several of the tutorials I discovered used this as a basis for their rigs. I want to emulate that curve-like behavior, but Source does not support curves as deformers, only joints. This leaves me with two options: figure out a way to make joints attach themselves to a curve (but leave them adjustable for animation), or manually animate each and every joint to mimick curve-like behavior. Neither of those sound like very fun options.
My solution in a common tool used by animators called a pose manager. Rather than make an uber complex setup that limits the movement of the character's brow, I simple make a row of joints that span the brow, weight them in a very smooth gradient between each other, and use a pose manager to create the simple brow shapes that an animator can work with.
This prevents the need for complex curve-mimicking setups, and allows the animator to retain full control. I used five brow joints in the characters for this project. After some especially helpful advice from a veteran rigger, I have them all grouped under a non-used joint called Brow_REF, and that joint is connected back to the main head joint. Using empty "reference" joints like this can be a huge relief. It helps to keep the face neatly organized, and it only takes a few seconds to lock it down while you are skinning the weights.
Monday, September 6, 2010
Joint-Based Face Rig - Part 1
Early in on this project, I stumbled across a significant problem.

My problem is: there is no easy way to transfer facial animations from Maya to the Source engine. Without the ability to transfer data back and forth, it would be very difficult to produce the same exact short using each of the two methods. I mean, sure, we could re-animate each scene twice... but for me, that sounds like a needless waste of time and also would introduce some unwelcome variables into my study. The issue here lies in how each of the programs deal with blendshapes.
Anyway, since there is no way to transfer blendshape animation data back and forth from these two sources, my only feasible option is to ignore blendshapes entirely and do everything with bones. You can animate a character's face with nothing but a pile of bones, and in some places this is very useful. The jaw is a great example of this. Natural jaw motion rotates, where jaw motions done with blendshapes tend to be linear and kinda gross looking in comparison. So, armed with little anecdotes like this, I strove out a couple months ago to pin down the best way to make a full face using bones...
...and I found zippo. When it comes to joint-based rigs, nobody seems to agree on anything. There are, maybe, four decent tutorials spread across all the internet on how to do this. And at the time of this writing, one of those has been taken down. The rigging books I purchased had little to say on the matter. Sure there's a few demo videos by riggers and Technical Directors on Vimeo and Youtube, but they are not as instructive as they are braggy. In an effort to save some other poor soul the time it took me to gather info, my next several posts will be about this process.
In the end, I couldn't turn to any of these (or the others I stumbled across) for guidance. Many of them weren't exclusively bone-driven, and used tools that aren't available to me in my project. So I took what info I could, cobbled together things that I had figured out on my own, and got some guidance from some knowledgeable folk to help me avoid the really big roadbumps. In the end, I came up with this:

My next post will start going into the down-and-dirty, but for anyone who has stumbled across this blog post looking for an example of a joint-based face rig, joint-driven, bone-based, bone-driven, or however-you-call-it rigs, here is a basic example file, containing everything used to make the images above:
Maya 2009 project folder: Chef Bone Rig Example
(I should clarify, this isn't a full rig with all animation controls and such. It's just the geometry and the skeleton with all the skinning you need to make a pose. The finished product is available on part 5 of this post)

The opinion of Random Chef is not necessarily the opinion of myself. I don't mind blendshapes,
in fact I think they're pretty useful.
My problem is: there is no easy way to transfer facial animations from Maya to the Source engine. Without the ability to transfer data back and forth, it would be very difficult to produce the same exact short using each of the two methods. I mean, sure, we could re-animate each scene twice... but for me, that sounds like a needless waste of time and also would introduce some unwelcome variables into my study. The issue here lies in how each of the programs deal with blendshapes.
- For the layman I will explain: blendshapes are typically a bunch of pre-made facial expressions for the animators to use, so they are able to transition from one to the other while they work. A really good parallel can be drawn to the way faces were done in the movie Coraline.
Anyway, since there is no way to transfer blendshape animation data back and forth from these two sources, my only feasible option is to ignore blendshapes entirely and do everything with bones. You can animate a character's face with nothing but a pile of bones, and in some places this is very useful. The jaw is a great example of this. Natural jaw motion rotates, where jaw motions done with blendshapes tend to be linear and kinda gross looking in comparison. So, armed with little anecdotes like this, I strove out a couple months ago to pin down the best way to make a full face using bones...
...and I found zippo. When it comes to joint-based rigs, nobody seems to agree on anything. There are, maybe, four decent tutorials spread across all the internet on how to do this. And at the time of this writing, one of those has been taken down. The rigging books I purchased had little to say on the matter. Sure there's a few demo videos by riggers and Technical Directors on Vimeo and Youtube, but they are not as instructive as they are braggy. In an effort to save some other poor soul the time it took me to gather info, my next several posts will be about this process.
Here's a few of the demos I found:
A Few Tutorials I found:
DirtyOldToon's Tutorial (currently dead)
Joint-Based Facial Animation - Kilia Tutorial (This is closest to what I ended up doing)
In the end, I couldn't turn to any of these (or the others I stumbled across) for guidance. Many of them weren't exclusively bone-driven, and used tools that aren't available to me in my project. So I took what info I could, cobbled together things that I had figured out on my own, and got some guidance from some knowledgeable folk to help me avoid the really big roadbumps. In the end, I came up with this:

My next post will start going into the down-and-dirty, but for anyone who has stumbled across this blog post looking for an example of a joint-based face rig, joint-driven, bone-based, bone-driven, or however-you-call-it rigs, here is a basic example file, containing everything used to make the images above:
Maya 2009 project folder: Chef Bone Rig Example
(I should clarify, this isn't a full rig with all animation controls and such. It's just the geometry and the skeleton with all the skinning you need to make a pose. The finished product is available on part 5 of this post)
Subscribe to:
Posts (Atom)